Tag Archives: Step-by-Step

Custom Hobby Desk Project Part II

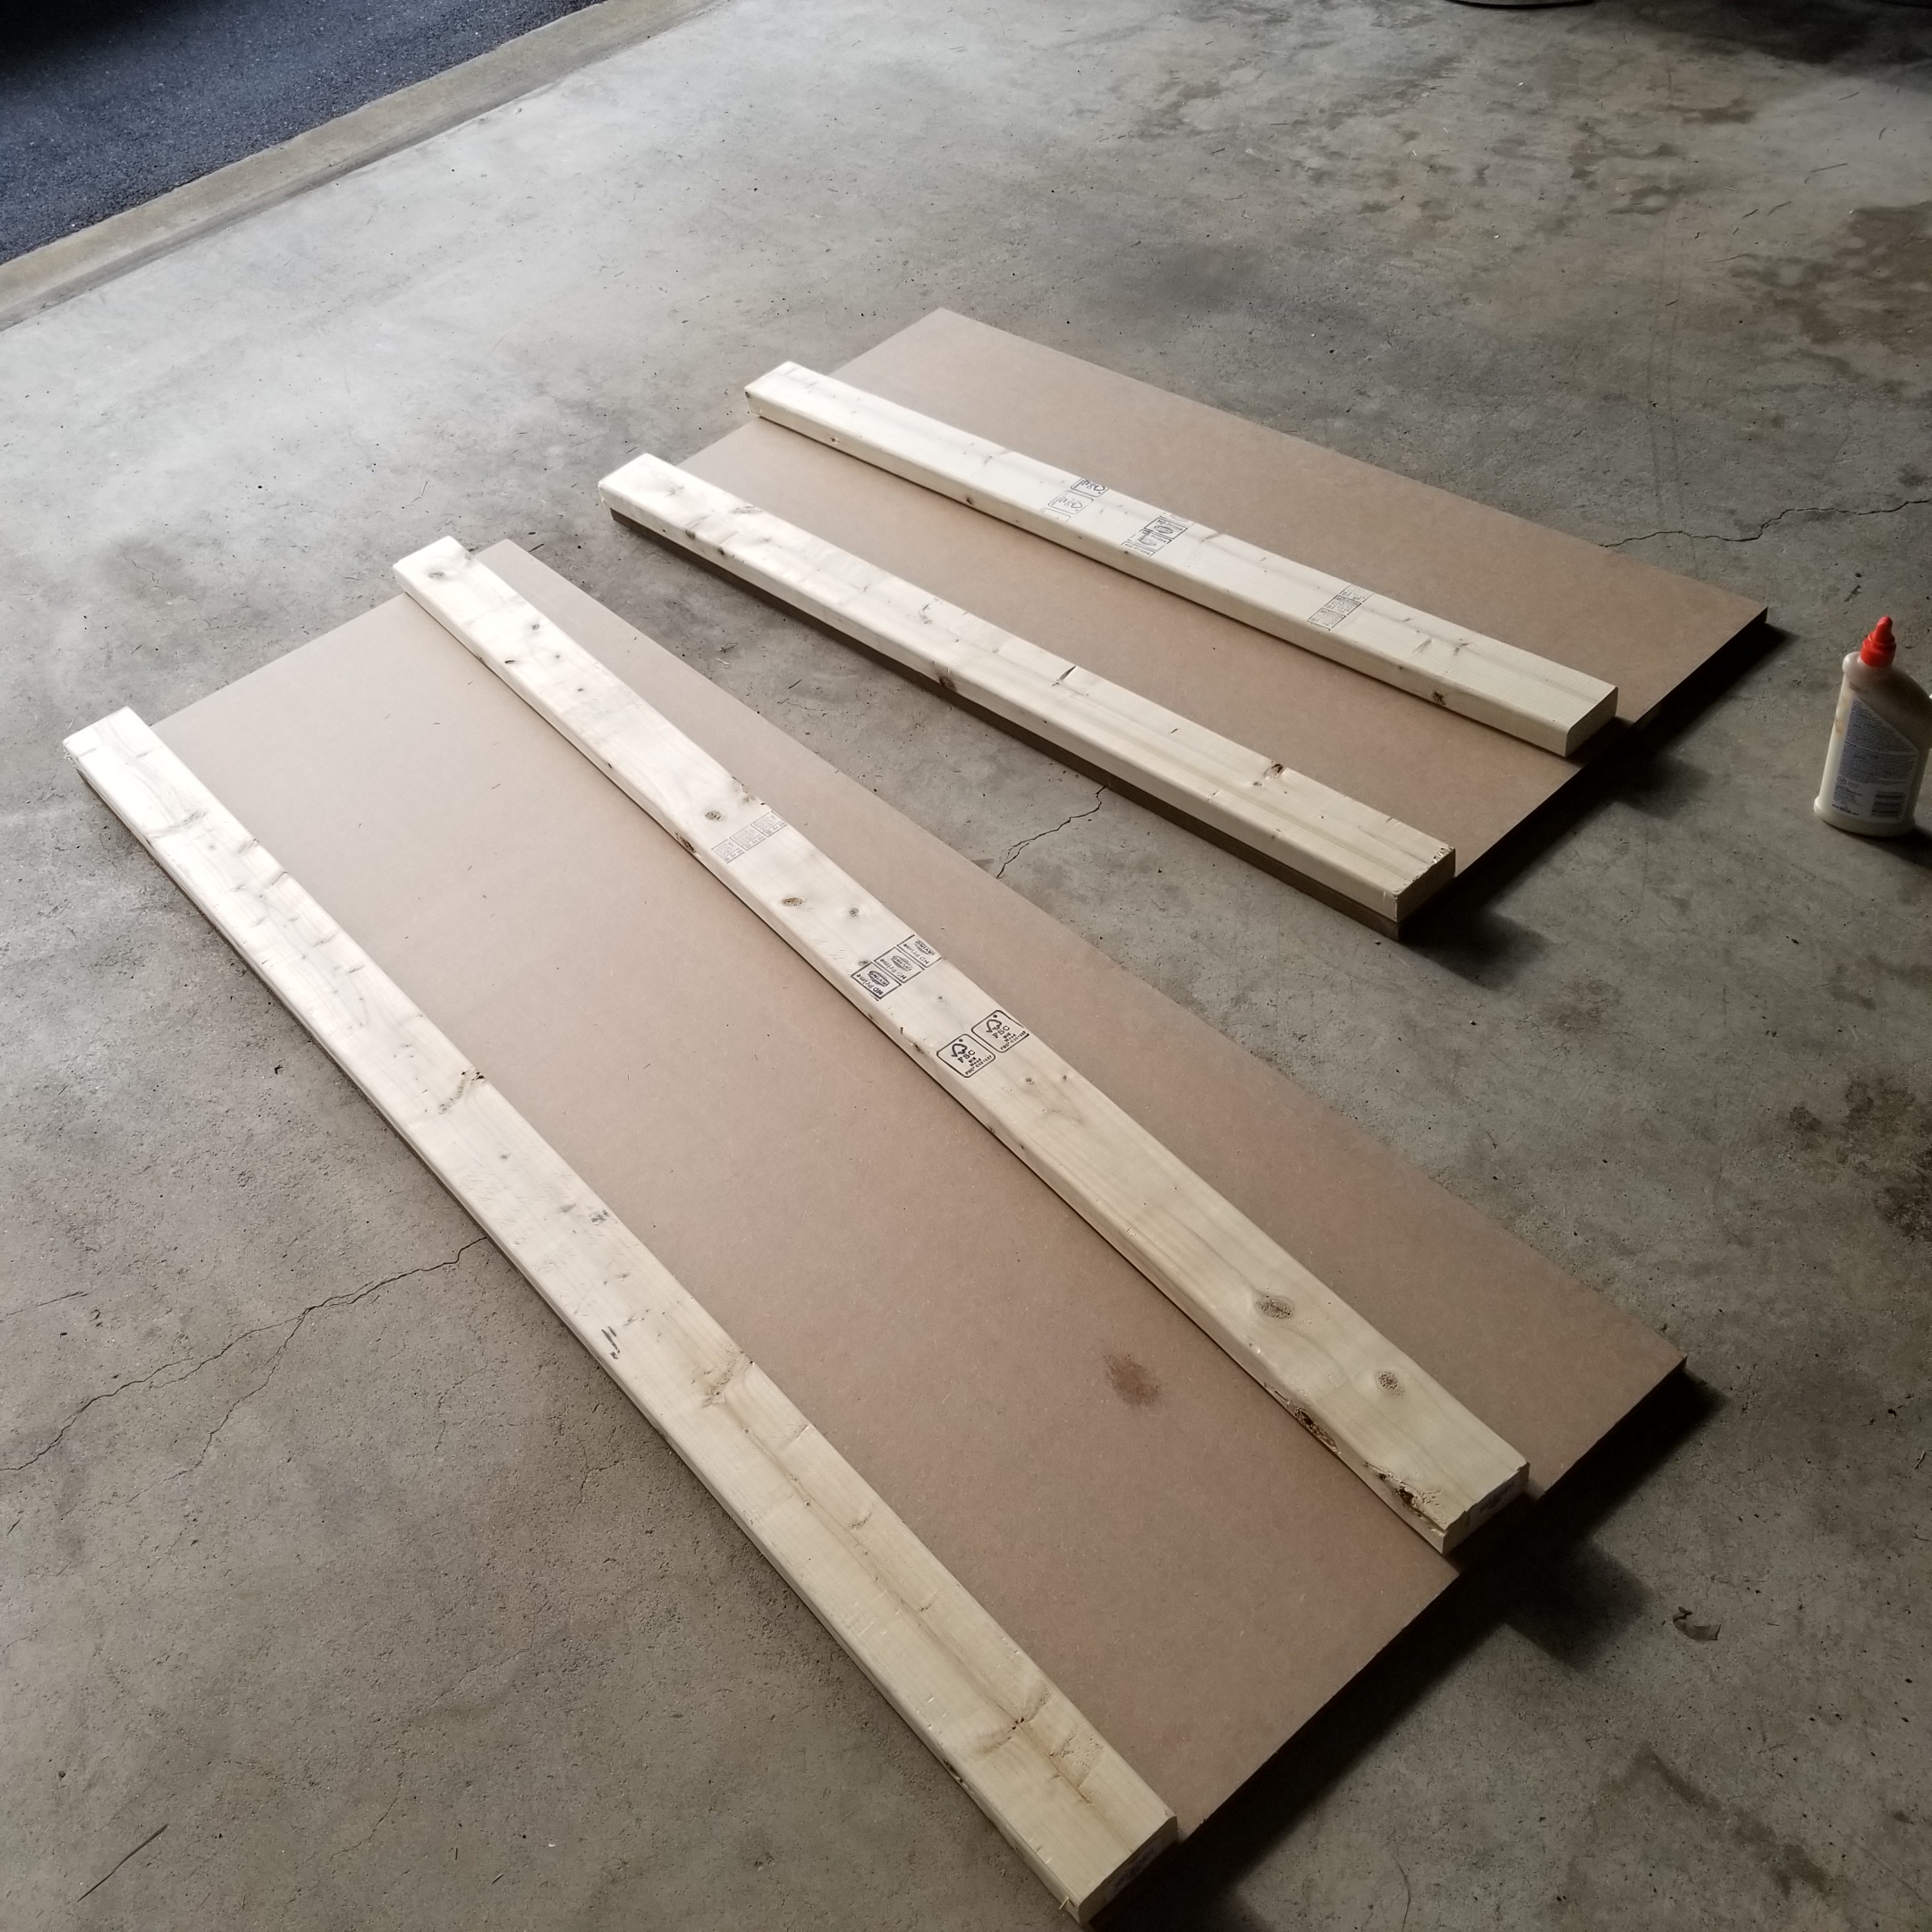
Well I decided to skip the trim for the second phase and move onto building the table itself. I’ve opted to go with a wall mounted design using steel pipe.


This project will come across a little dis-jointed. I had to completely build ½ of the desk to make sure my design was functional. The short side was built first and then replicated on the long side. Bear with me.


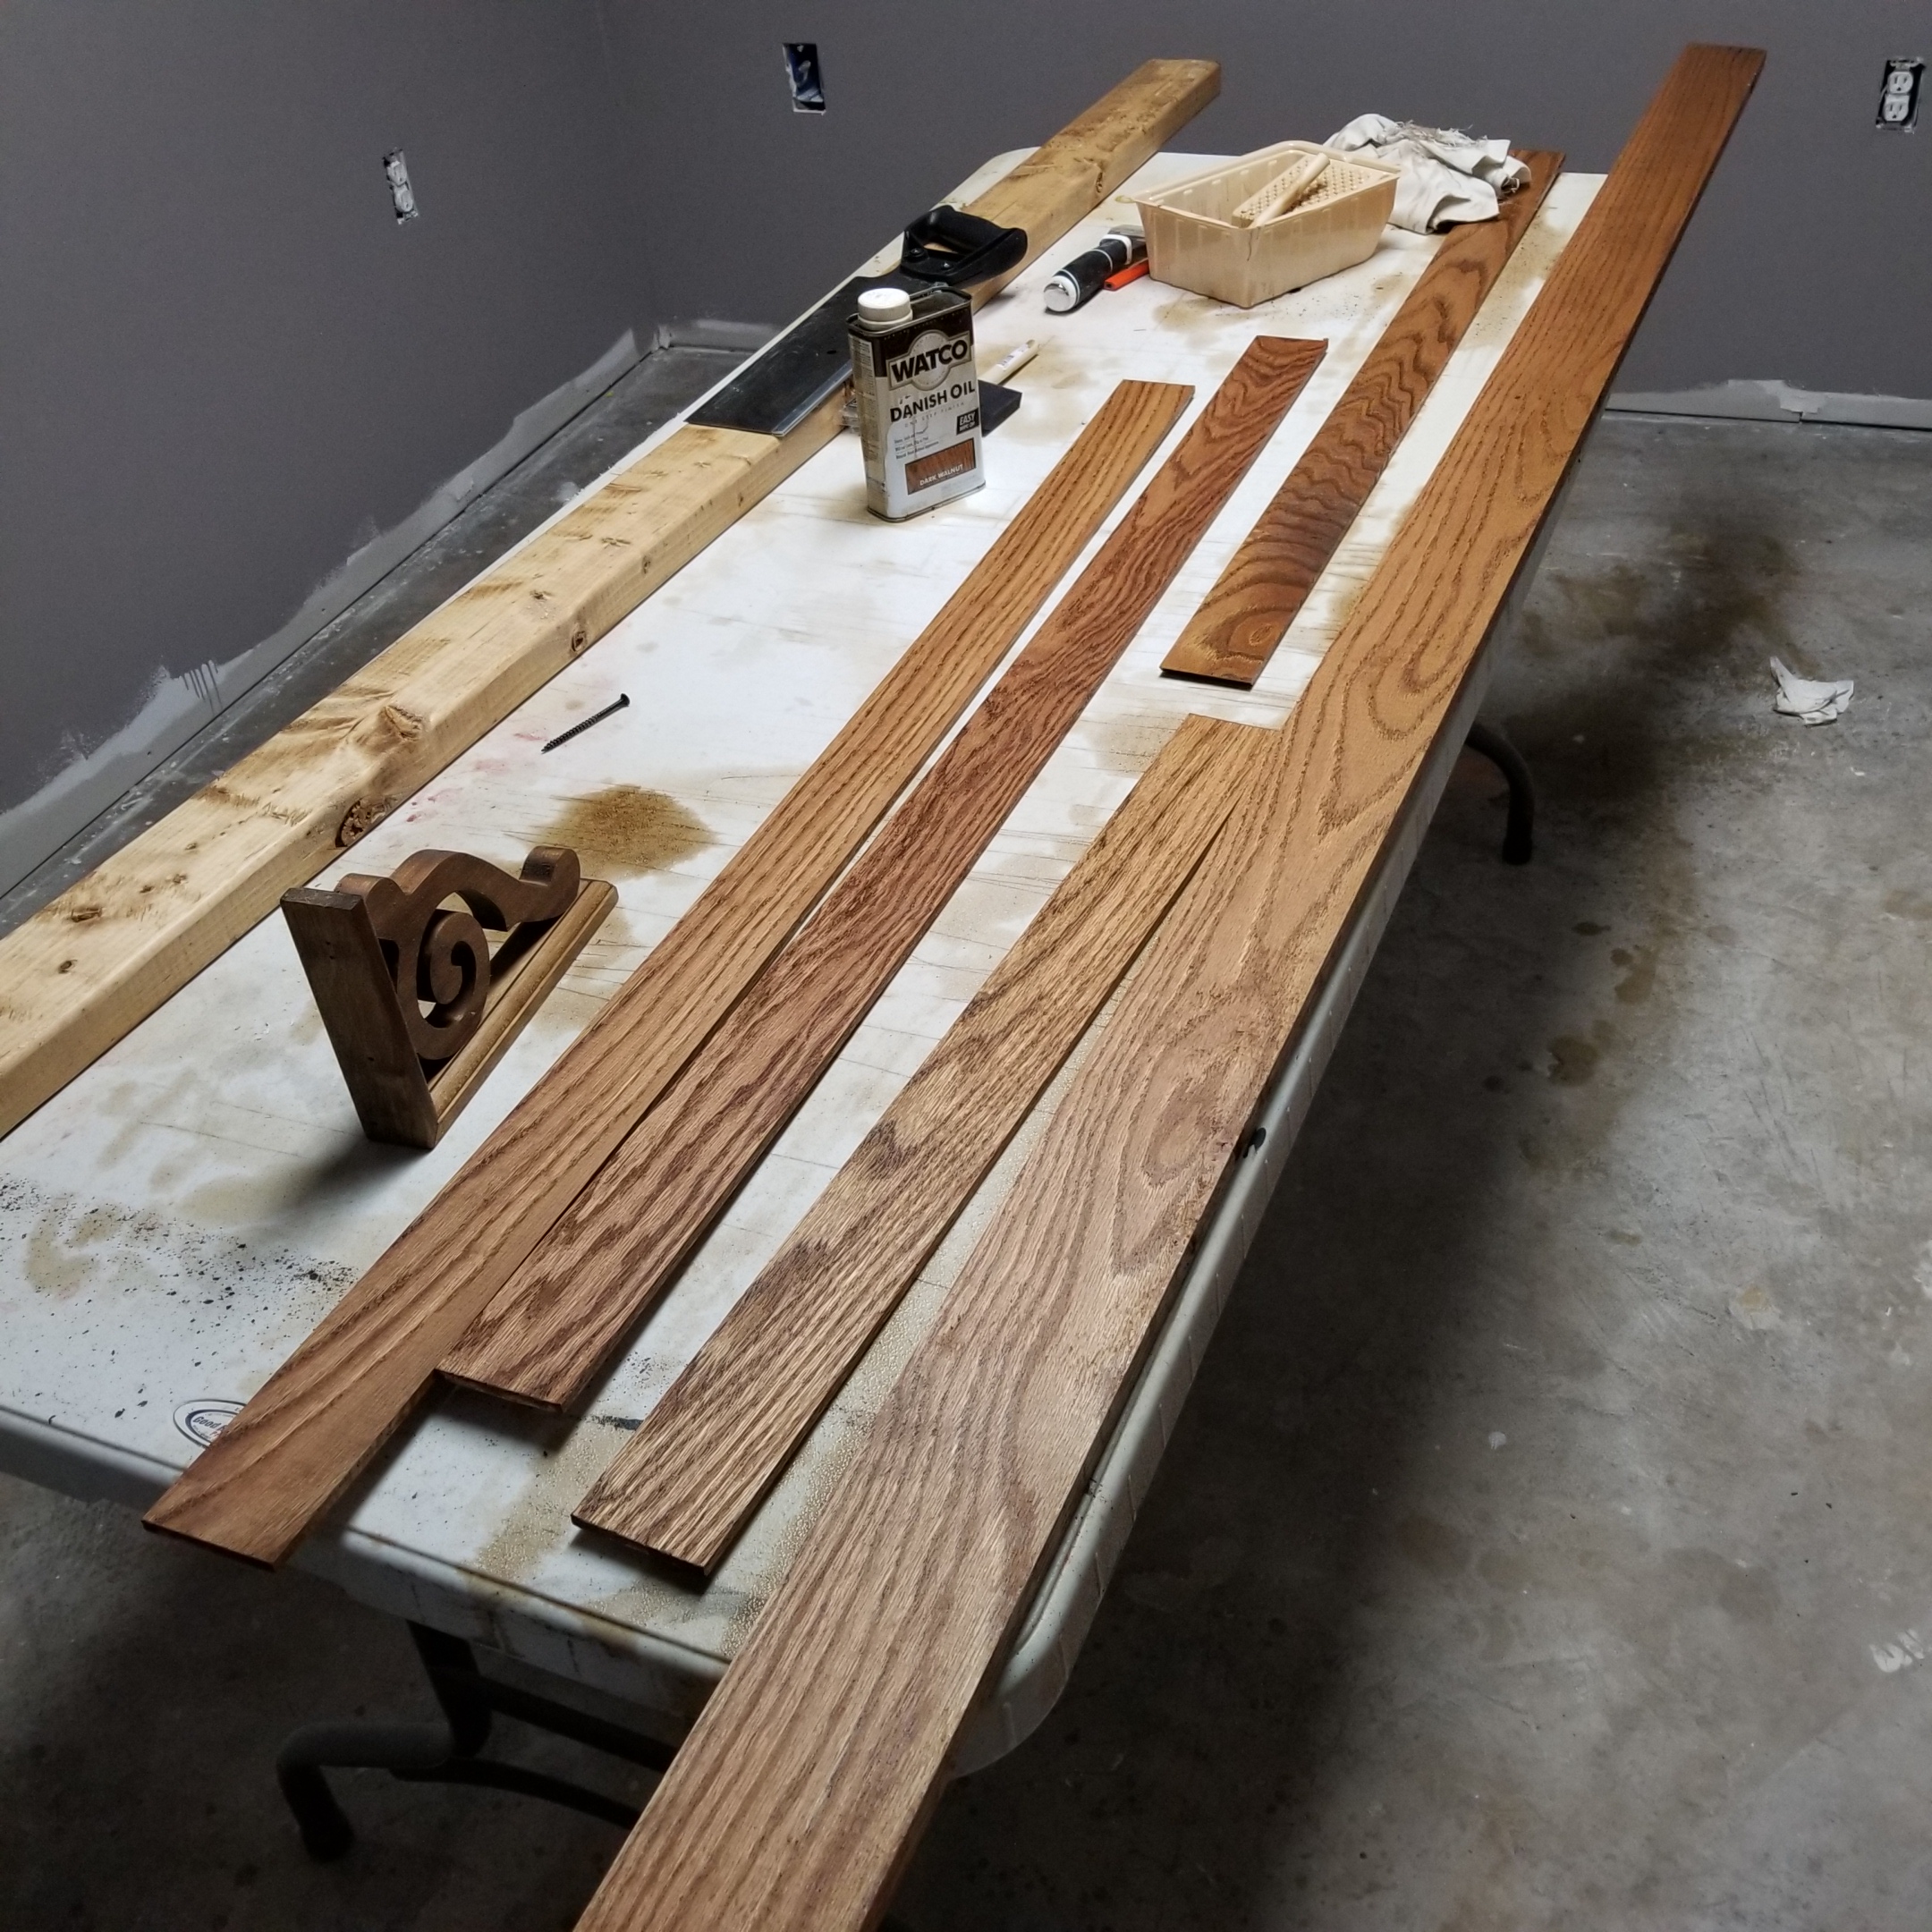
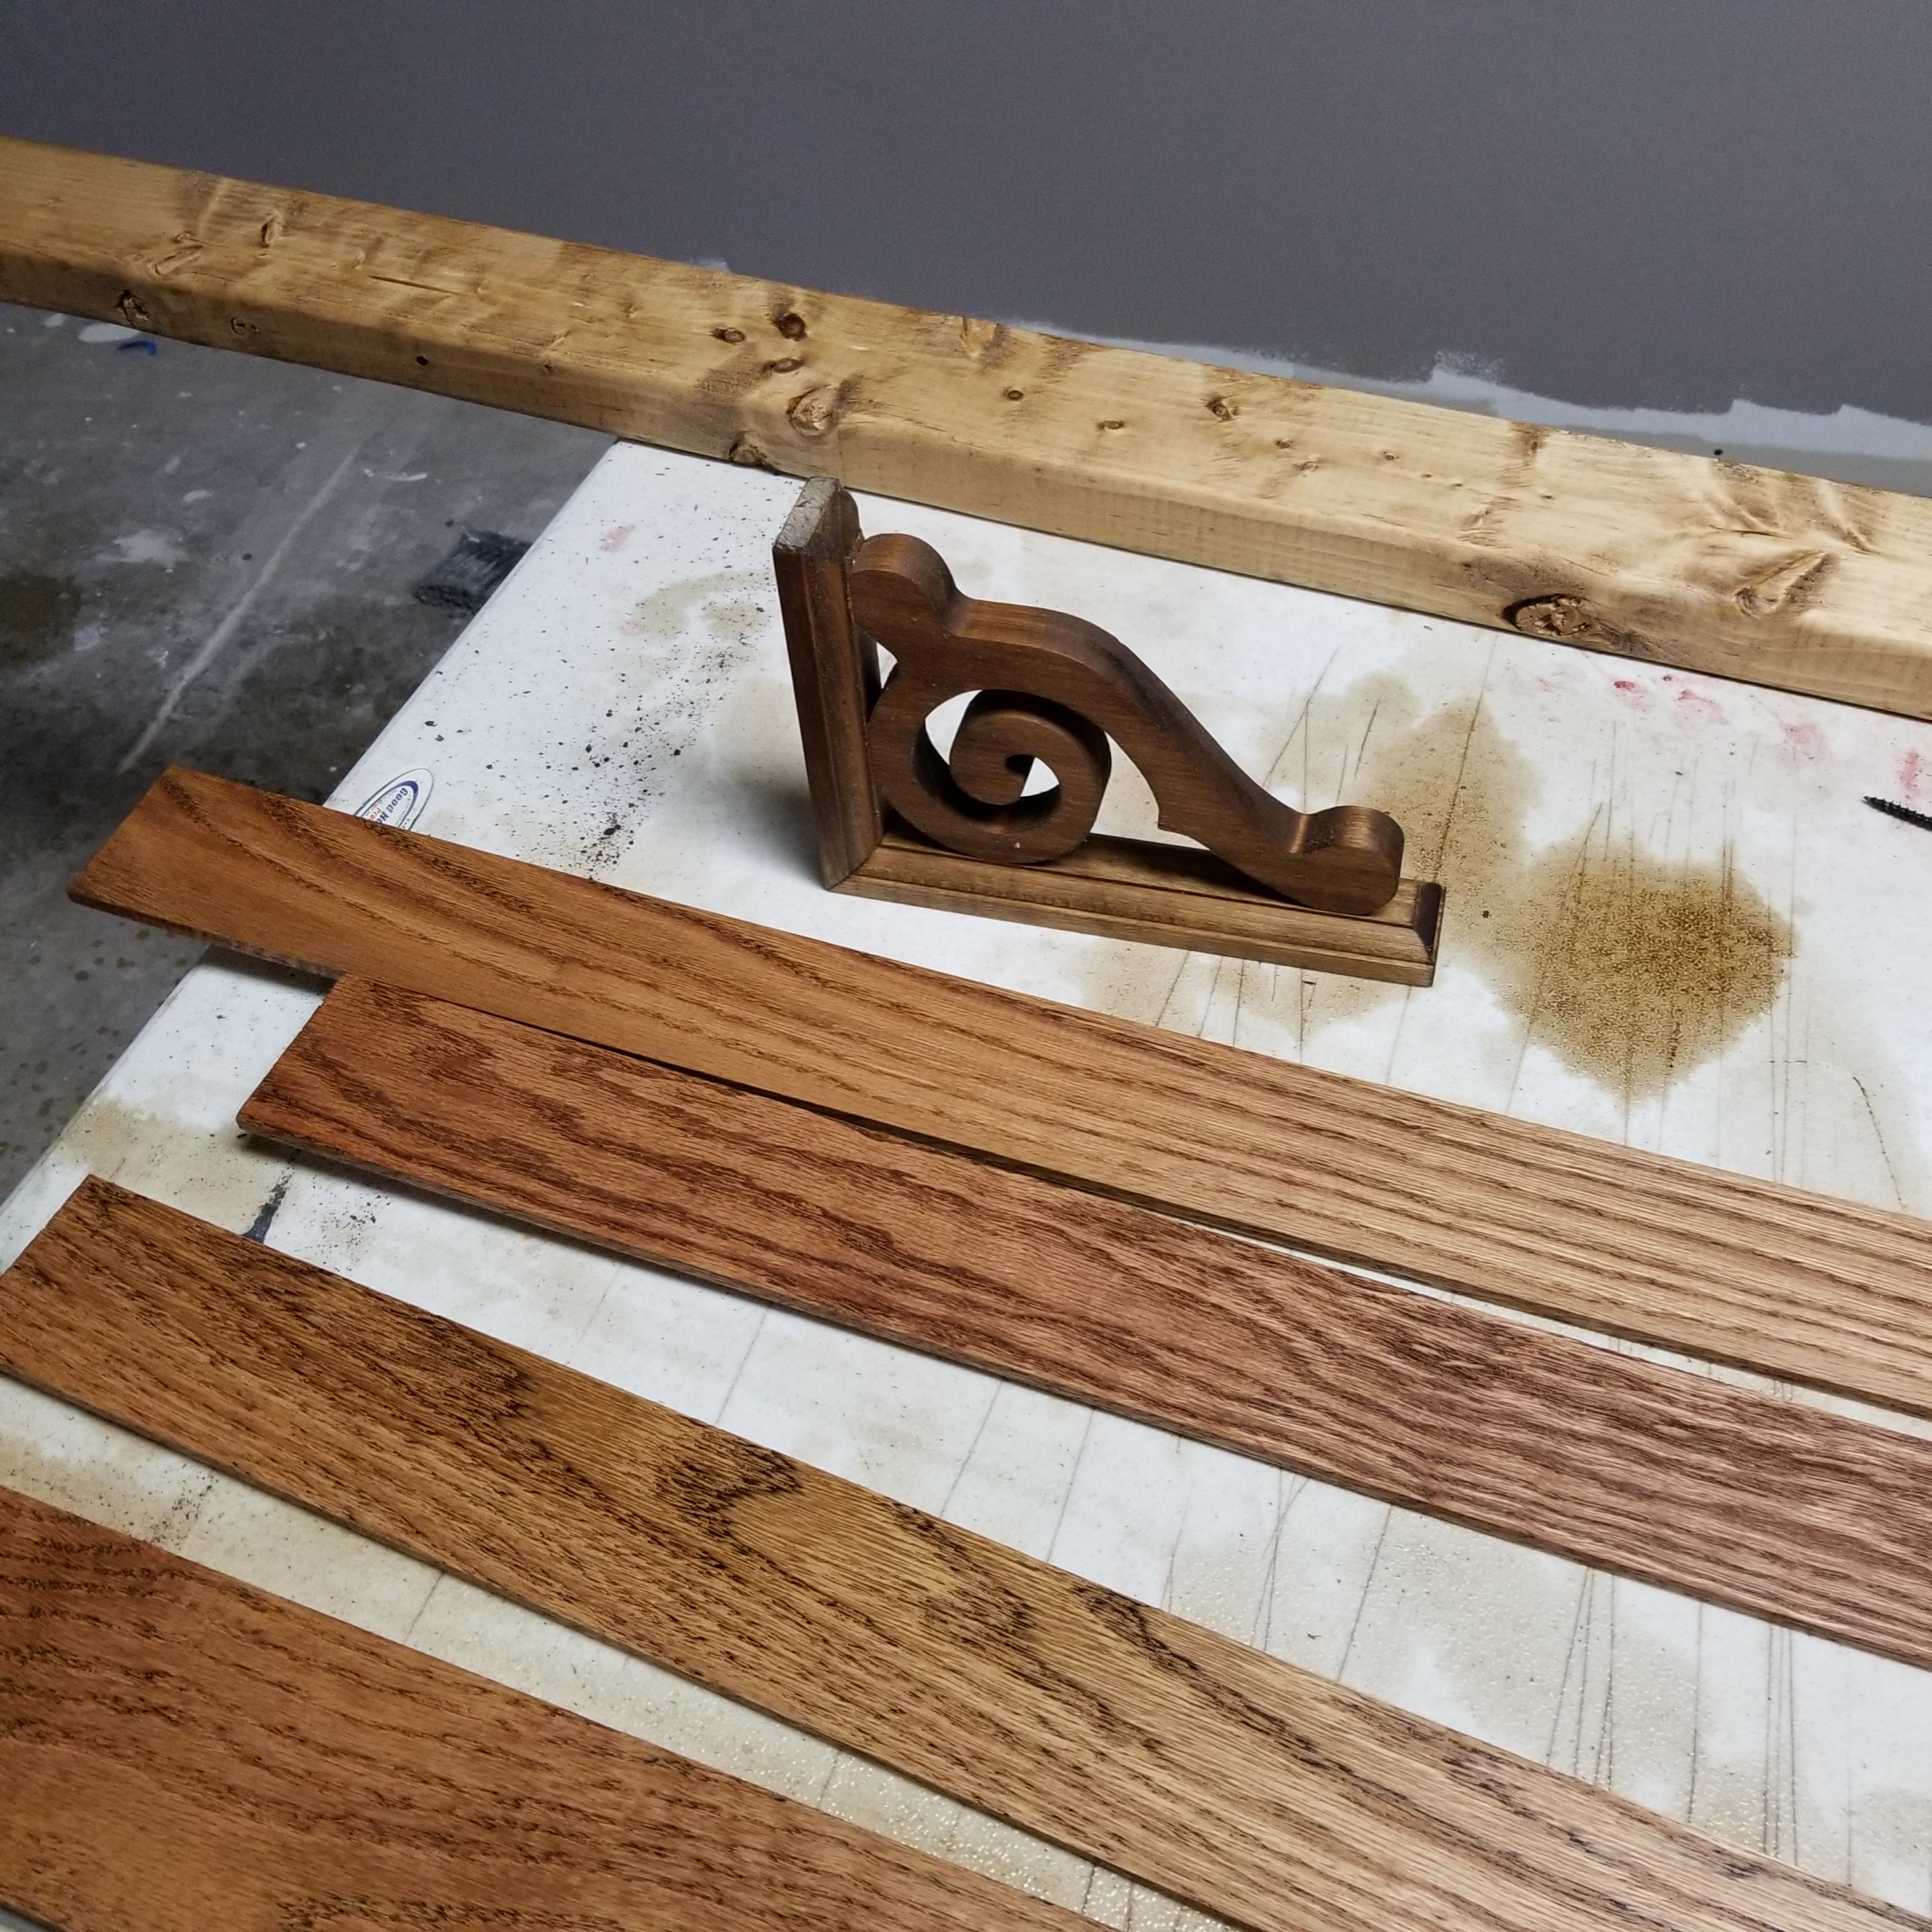
I wanted the desk to have some semi-aesthetic elements that would help it to blend into our basements redesign. The oak strips and trim have been finished in Dutch Oil to bring out the grain. The wood would also look smexy as hell with the black steel pipe.


The first thing I did was mount the oak strip to the wall. I used a wall stud to prop the board off the ground. The 3.5” height of the wall stud is perfect as it will allow me to install the baseboard trim later. After some wall stud hunting & pilot hole drilling, I mounted the oak board onto the wall.

Mounting Short Side Mounting Short Side Mounting Short Side
Mounting Short Side


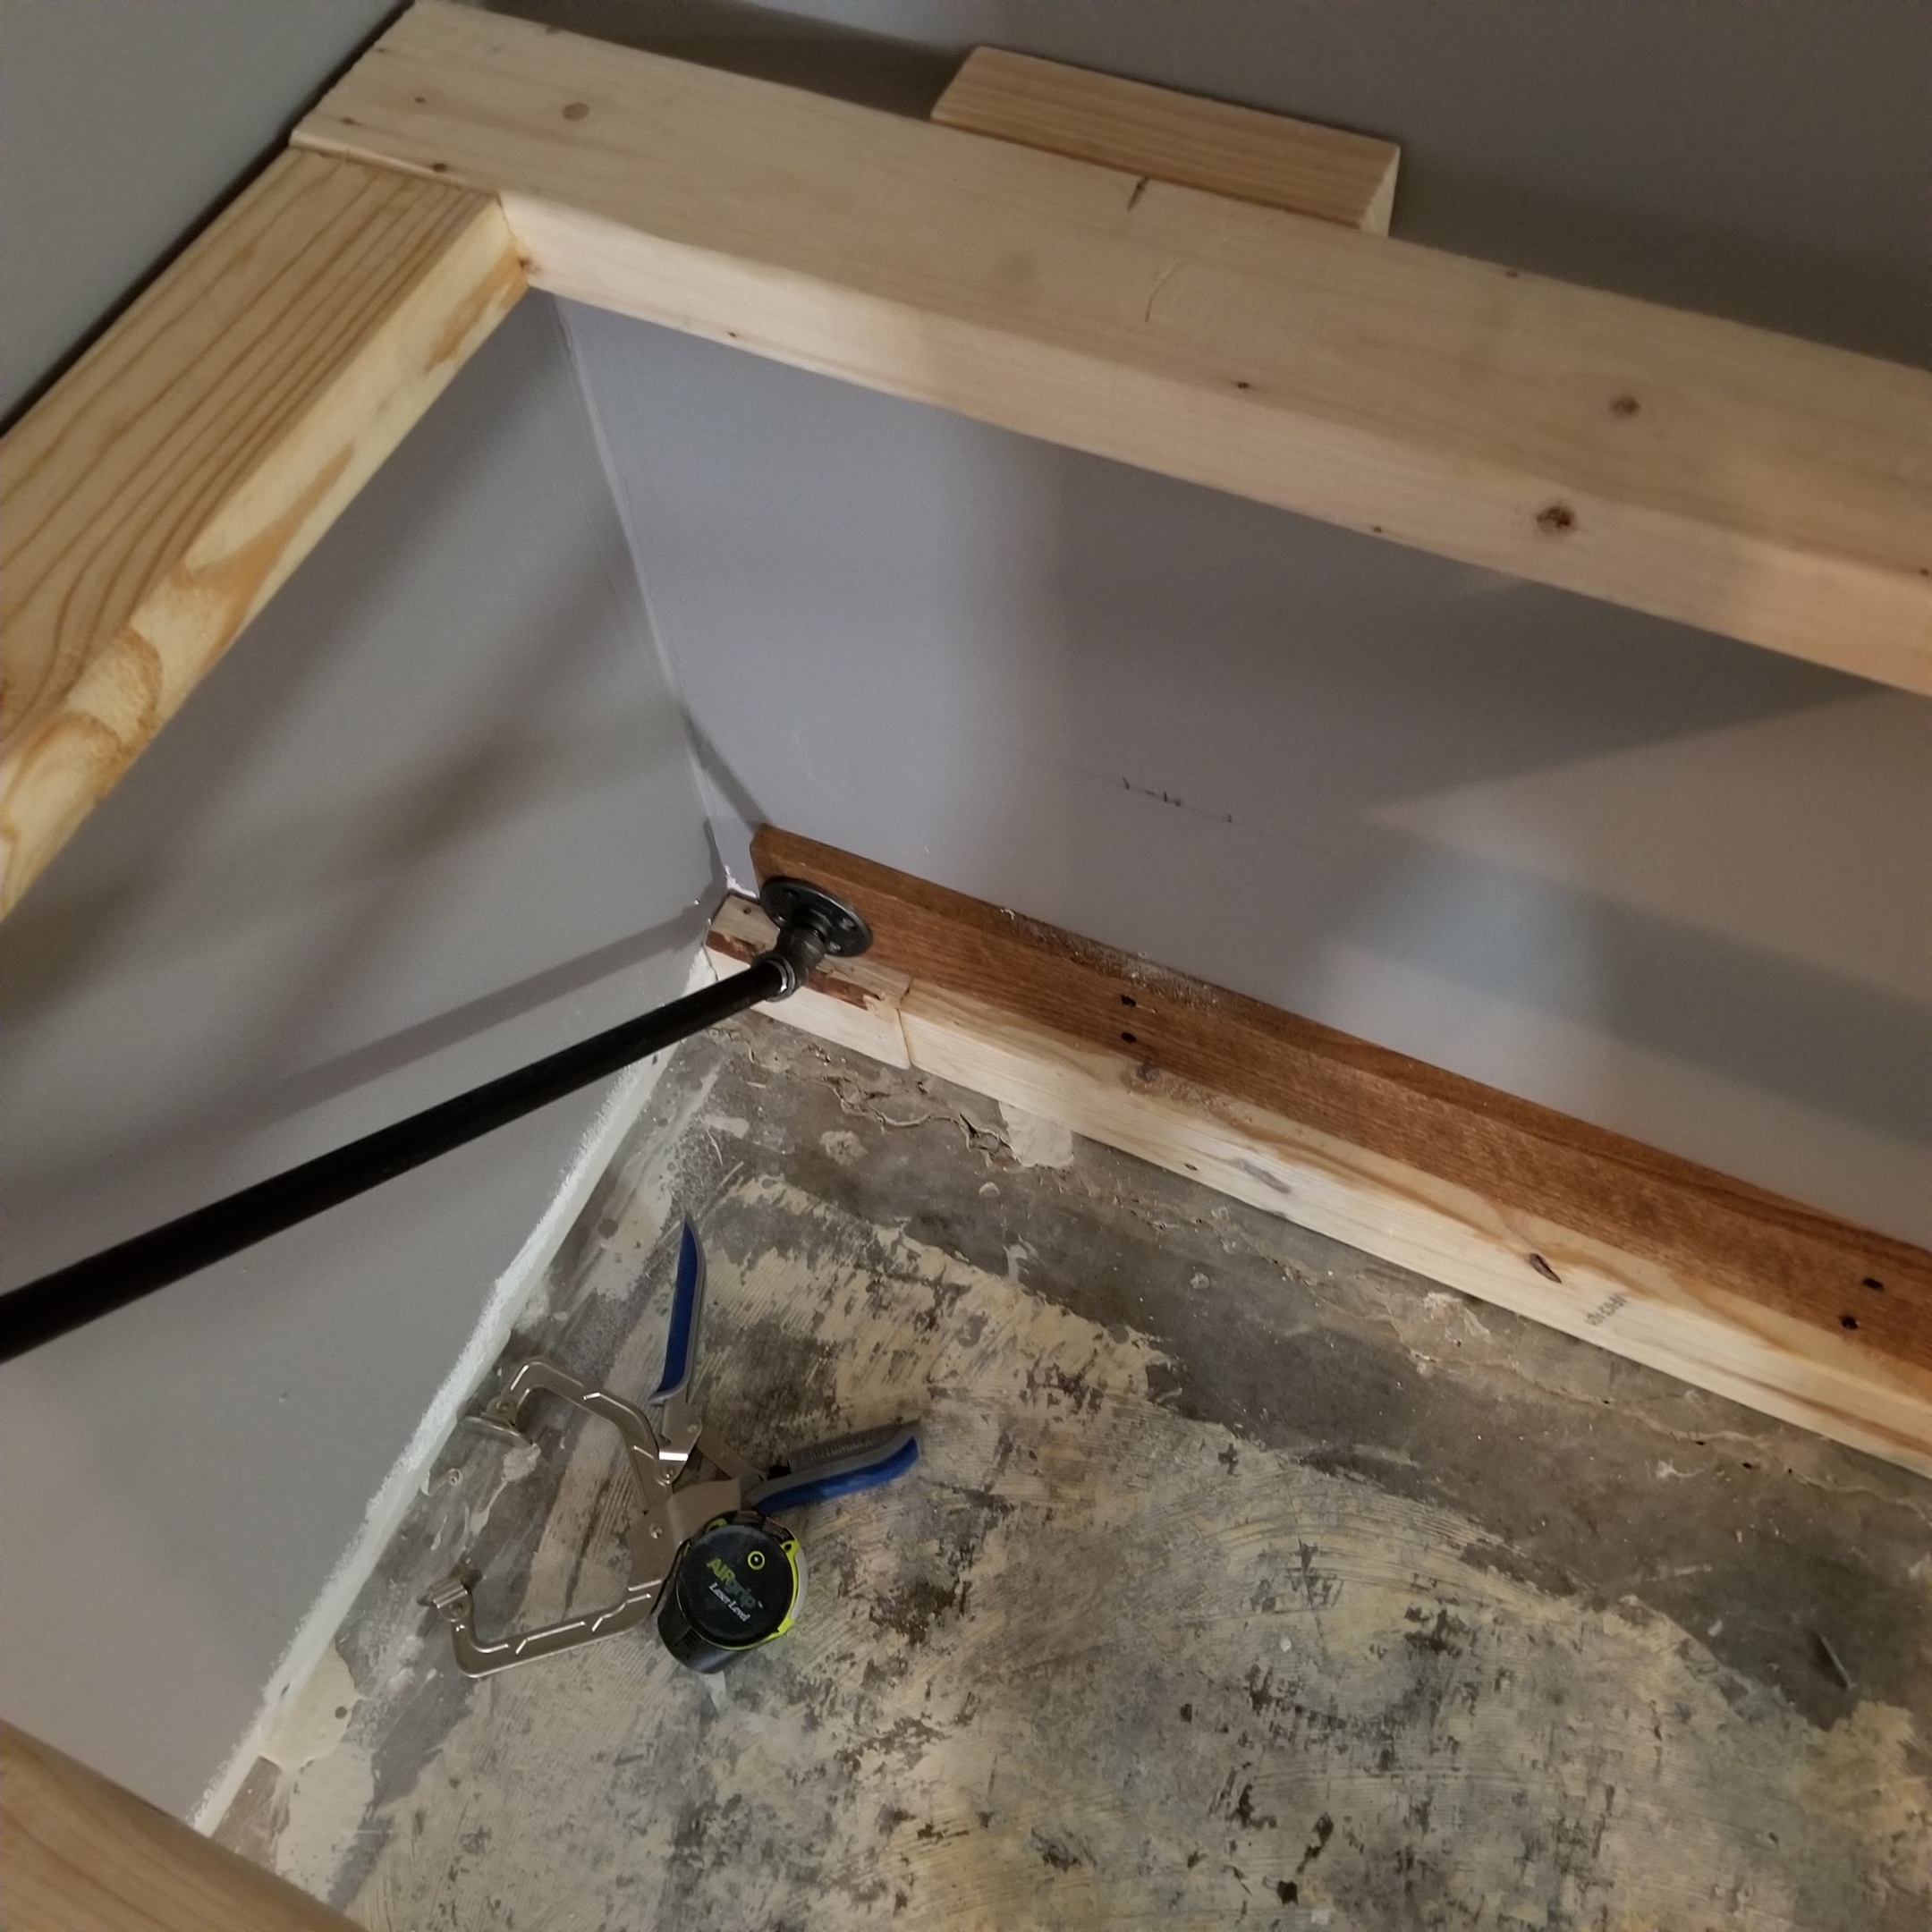
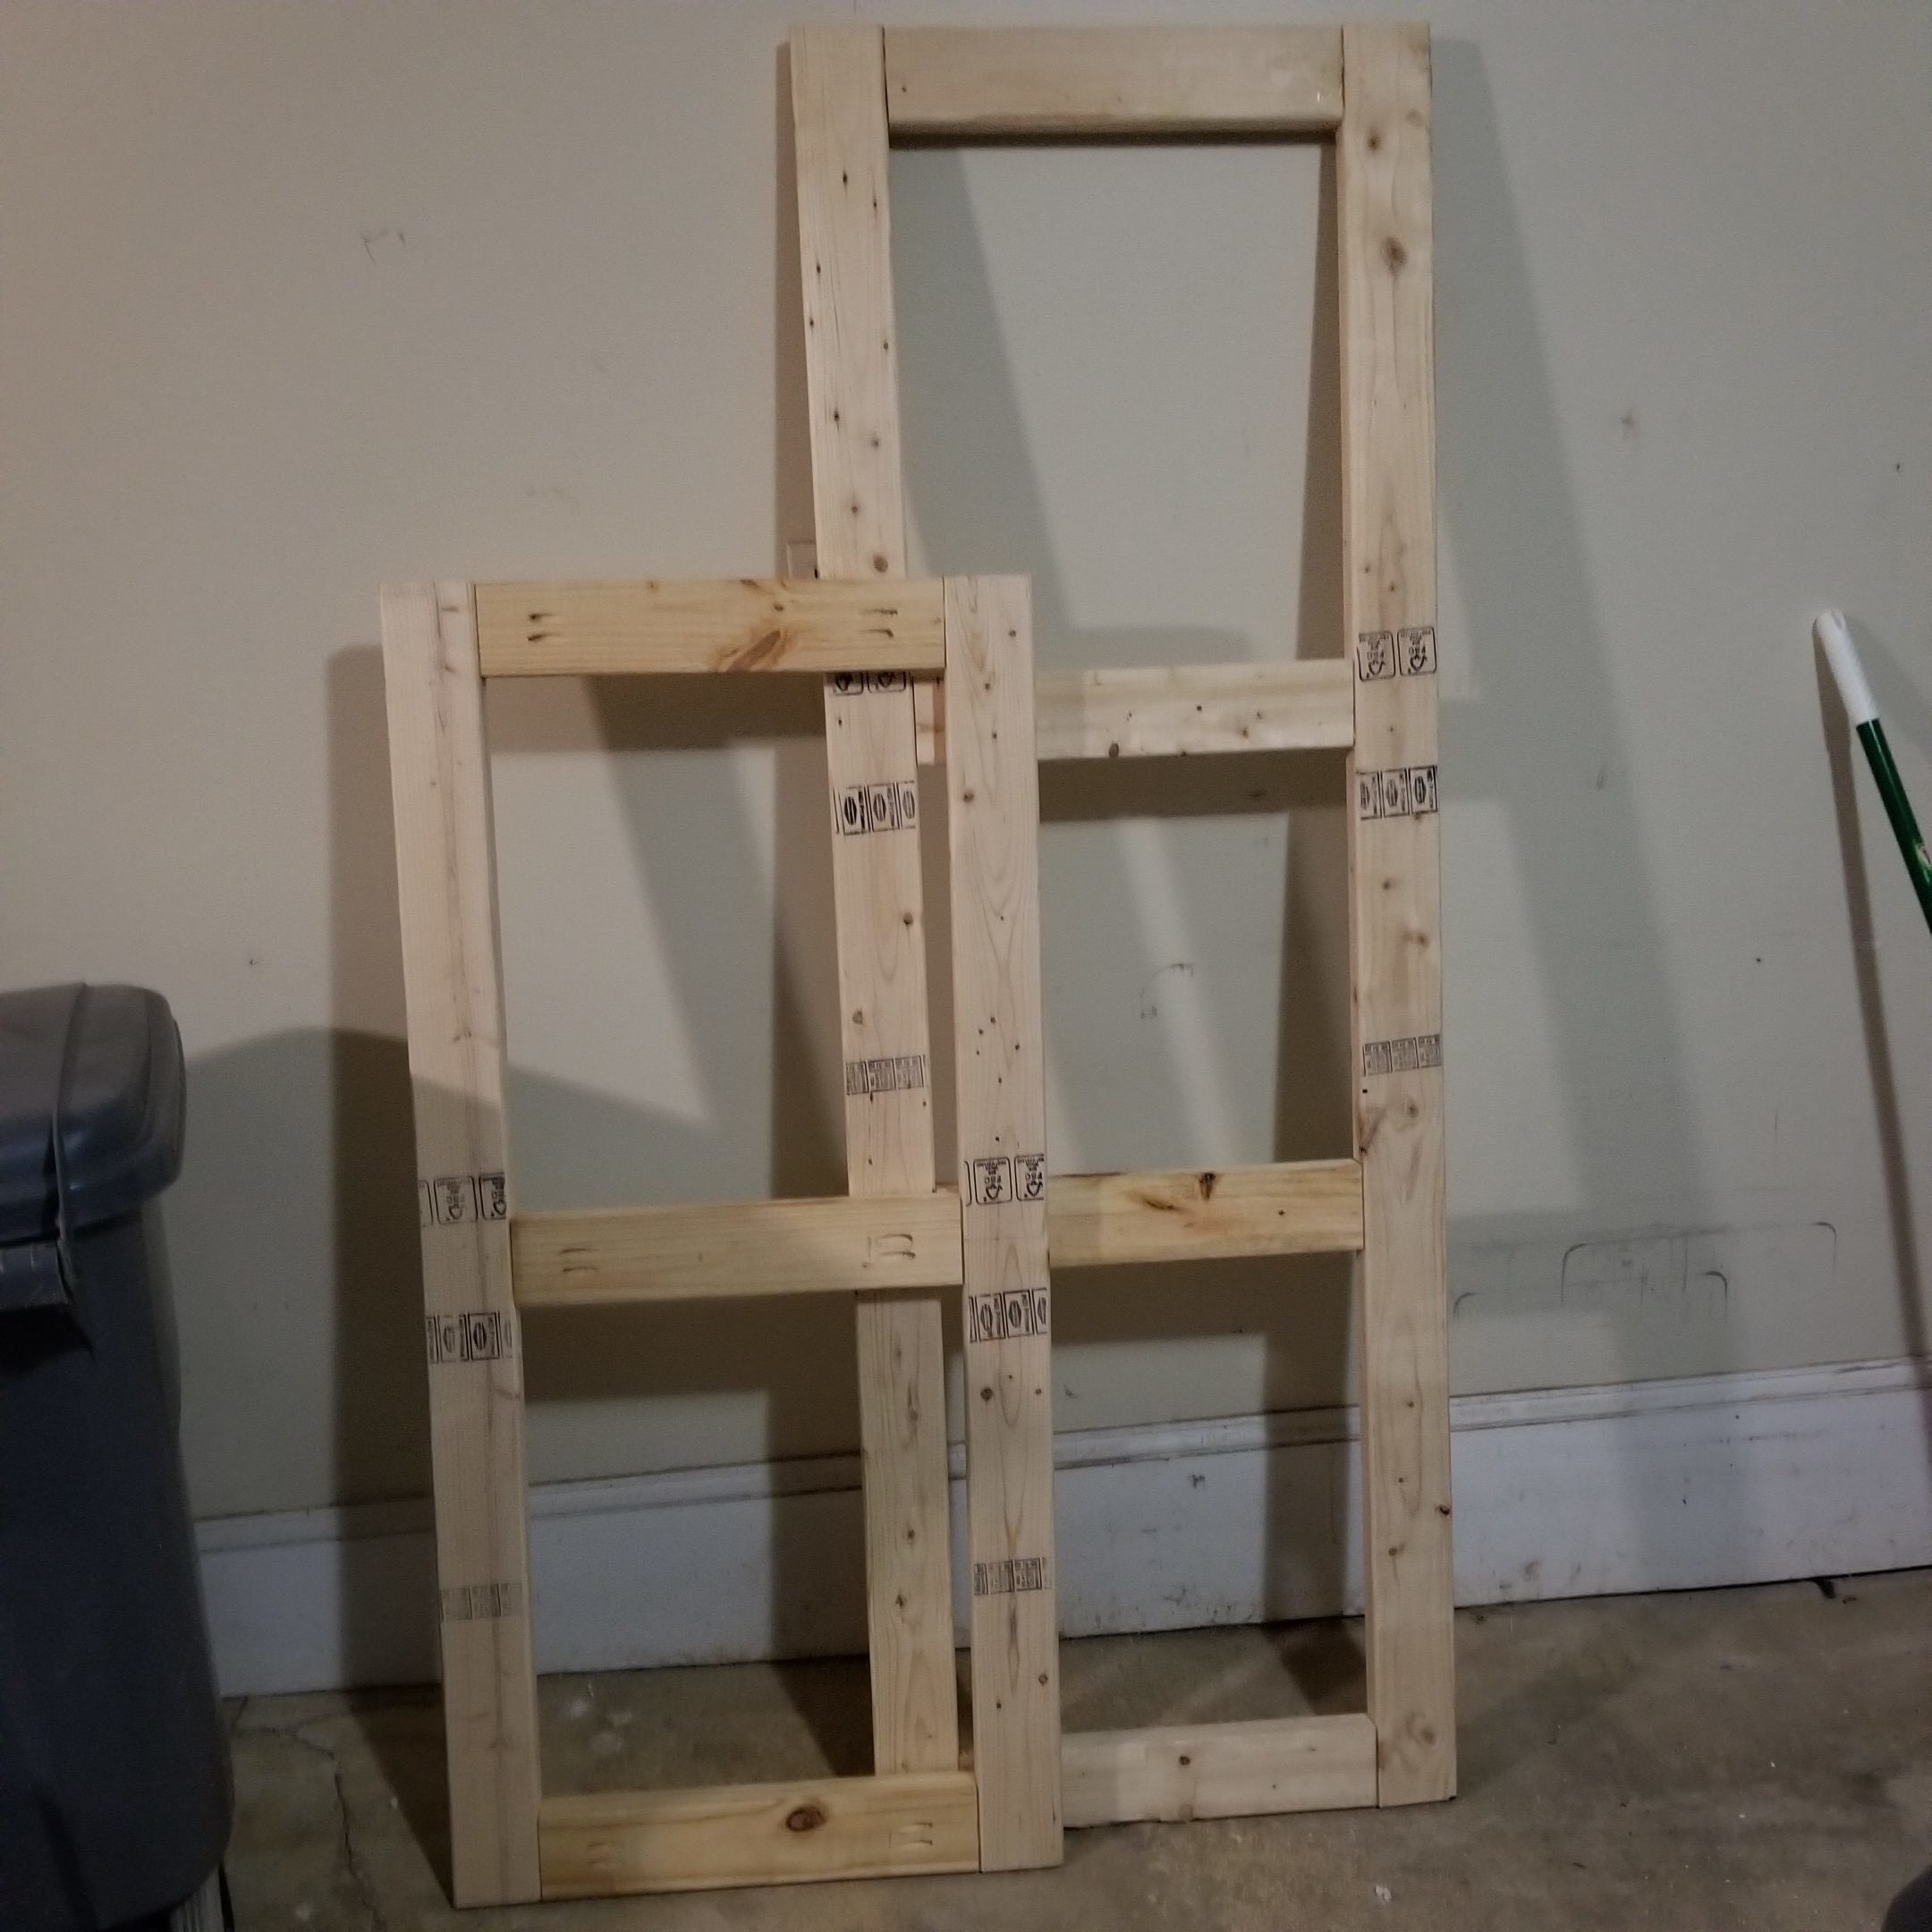
The next part was a real pain. I used threaded steel pipe and fixtures to build the support elements. The design uses a 45° support leg made from ½” pipe cut to 30” with a flange/nipple/elbow combo on both ends. One flange will be mounted onto the wall via the oak strip, and the other drilled into the table frame. The table will have three support legs on the long side and two on the short. The pain comes from trying to get all the legs level. As these must be screwed onto each other it’s a total crap-shoot trying to screw each part together the exact same way. I had to eyeball it and I hate doing that…


This is a rather imperfect method as it’s nearly impossible to get all the support pipes to be perfectly in line with each other. In retrospect, I should have used Kee Klamps and straight pipe for this purpose. It would have been really precise and easier to be sure. But what ya gonna do?


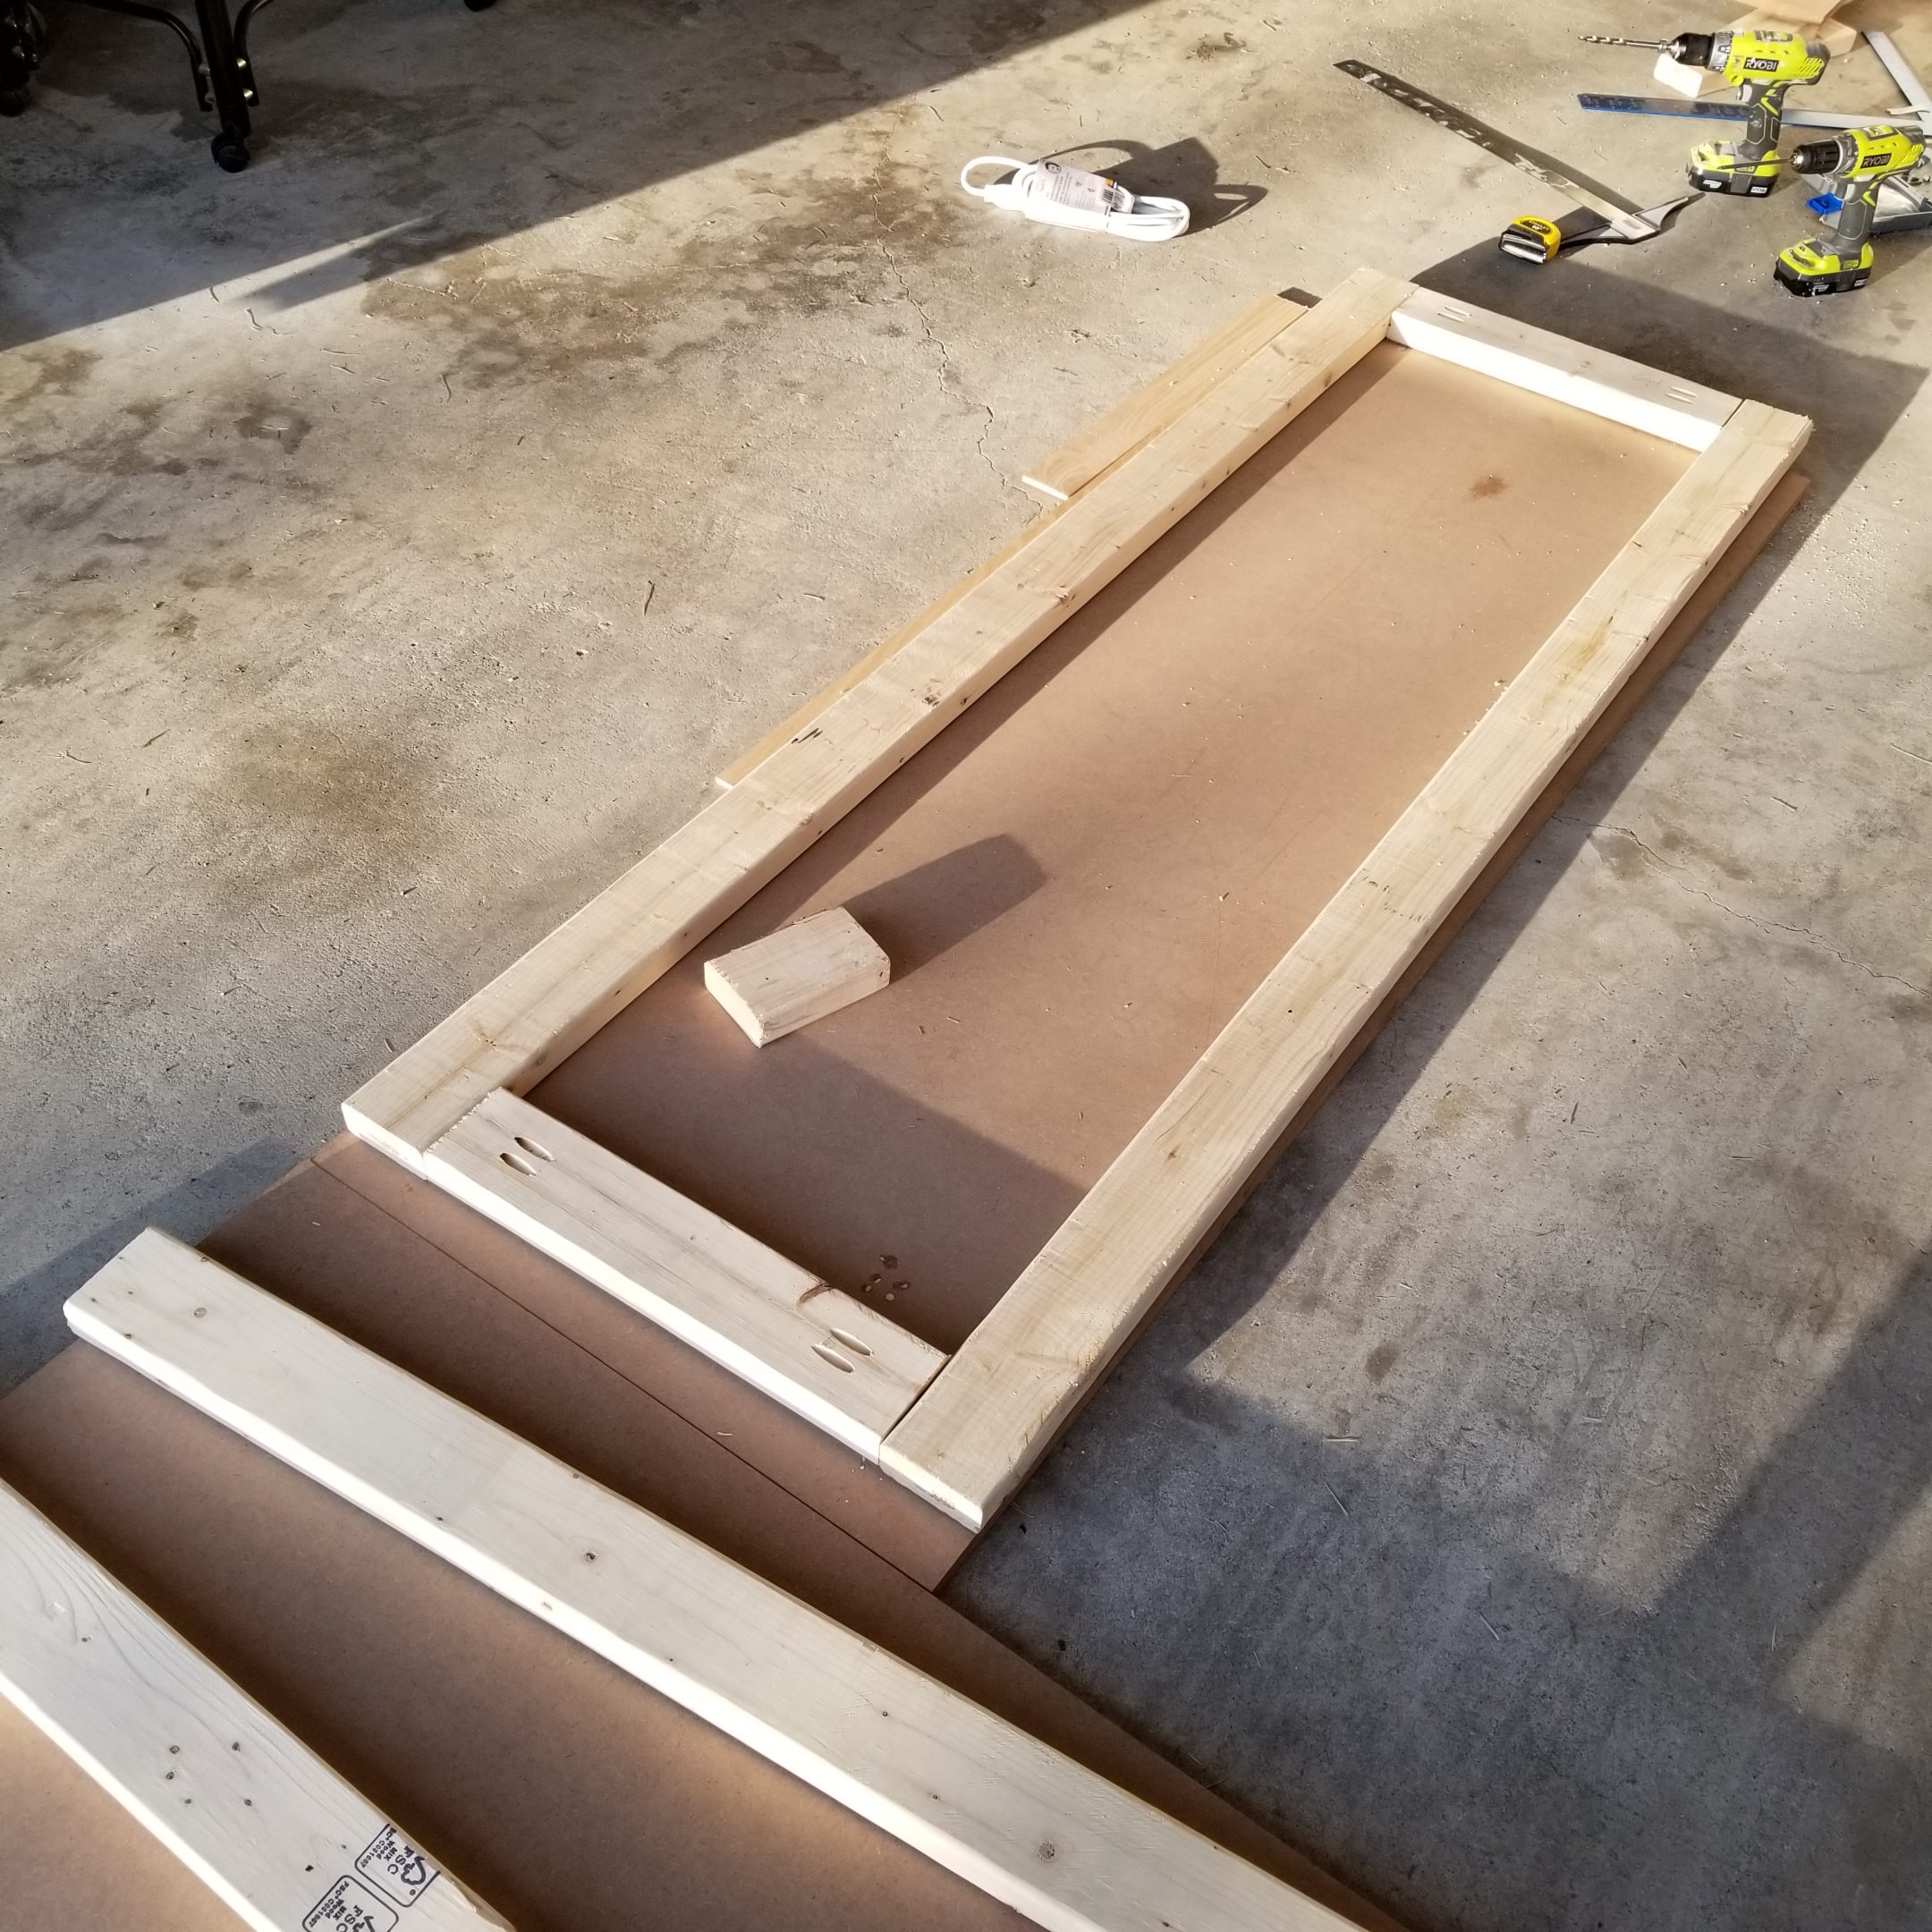
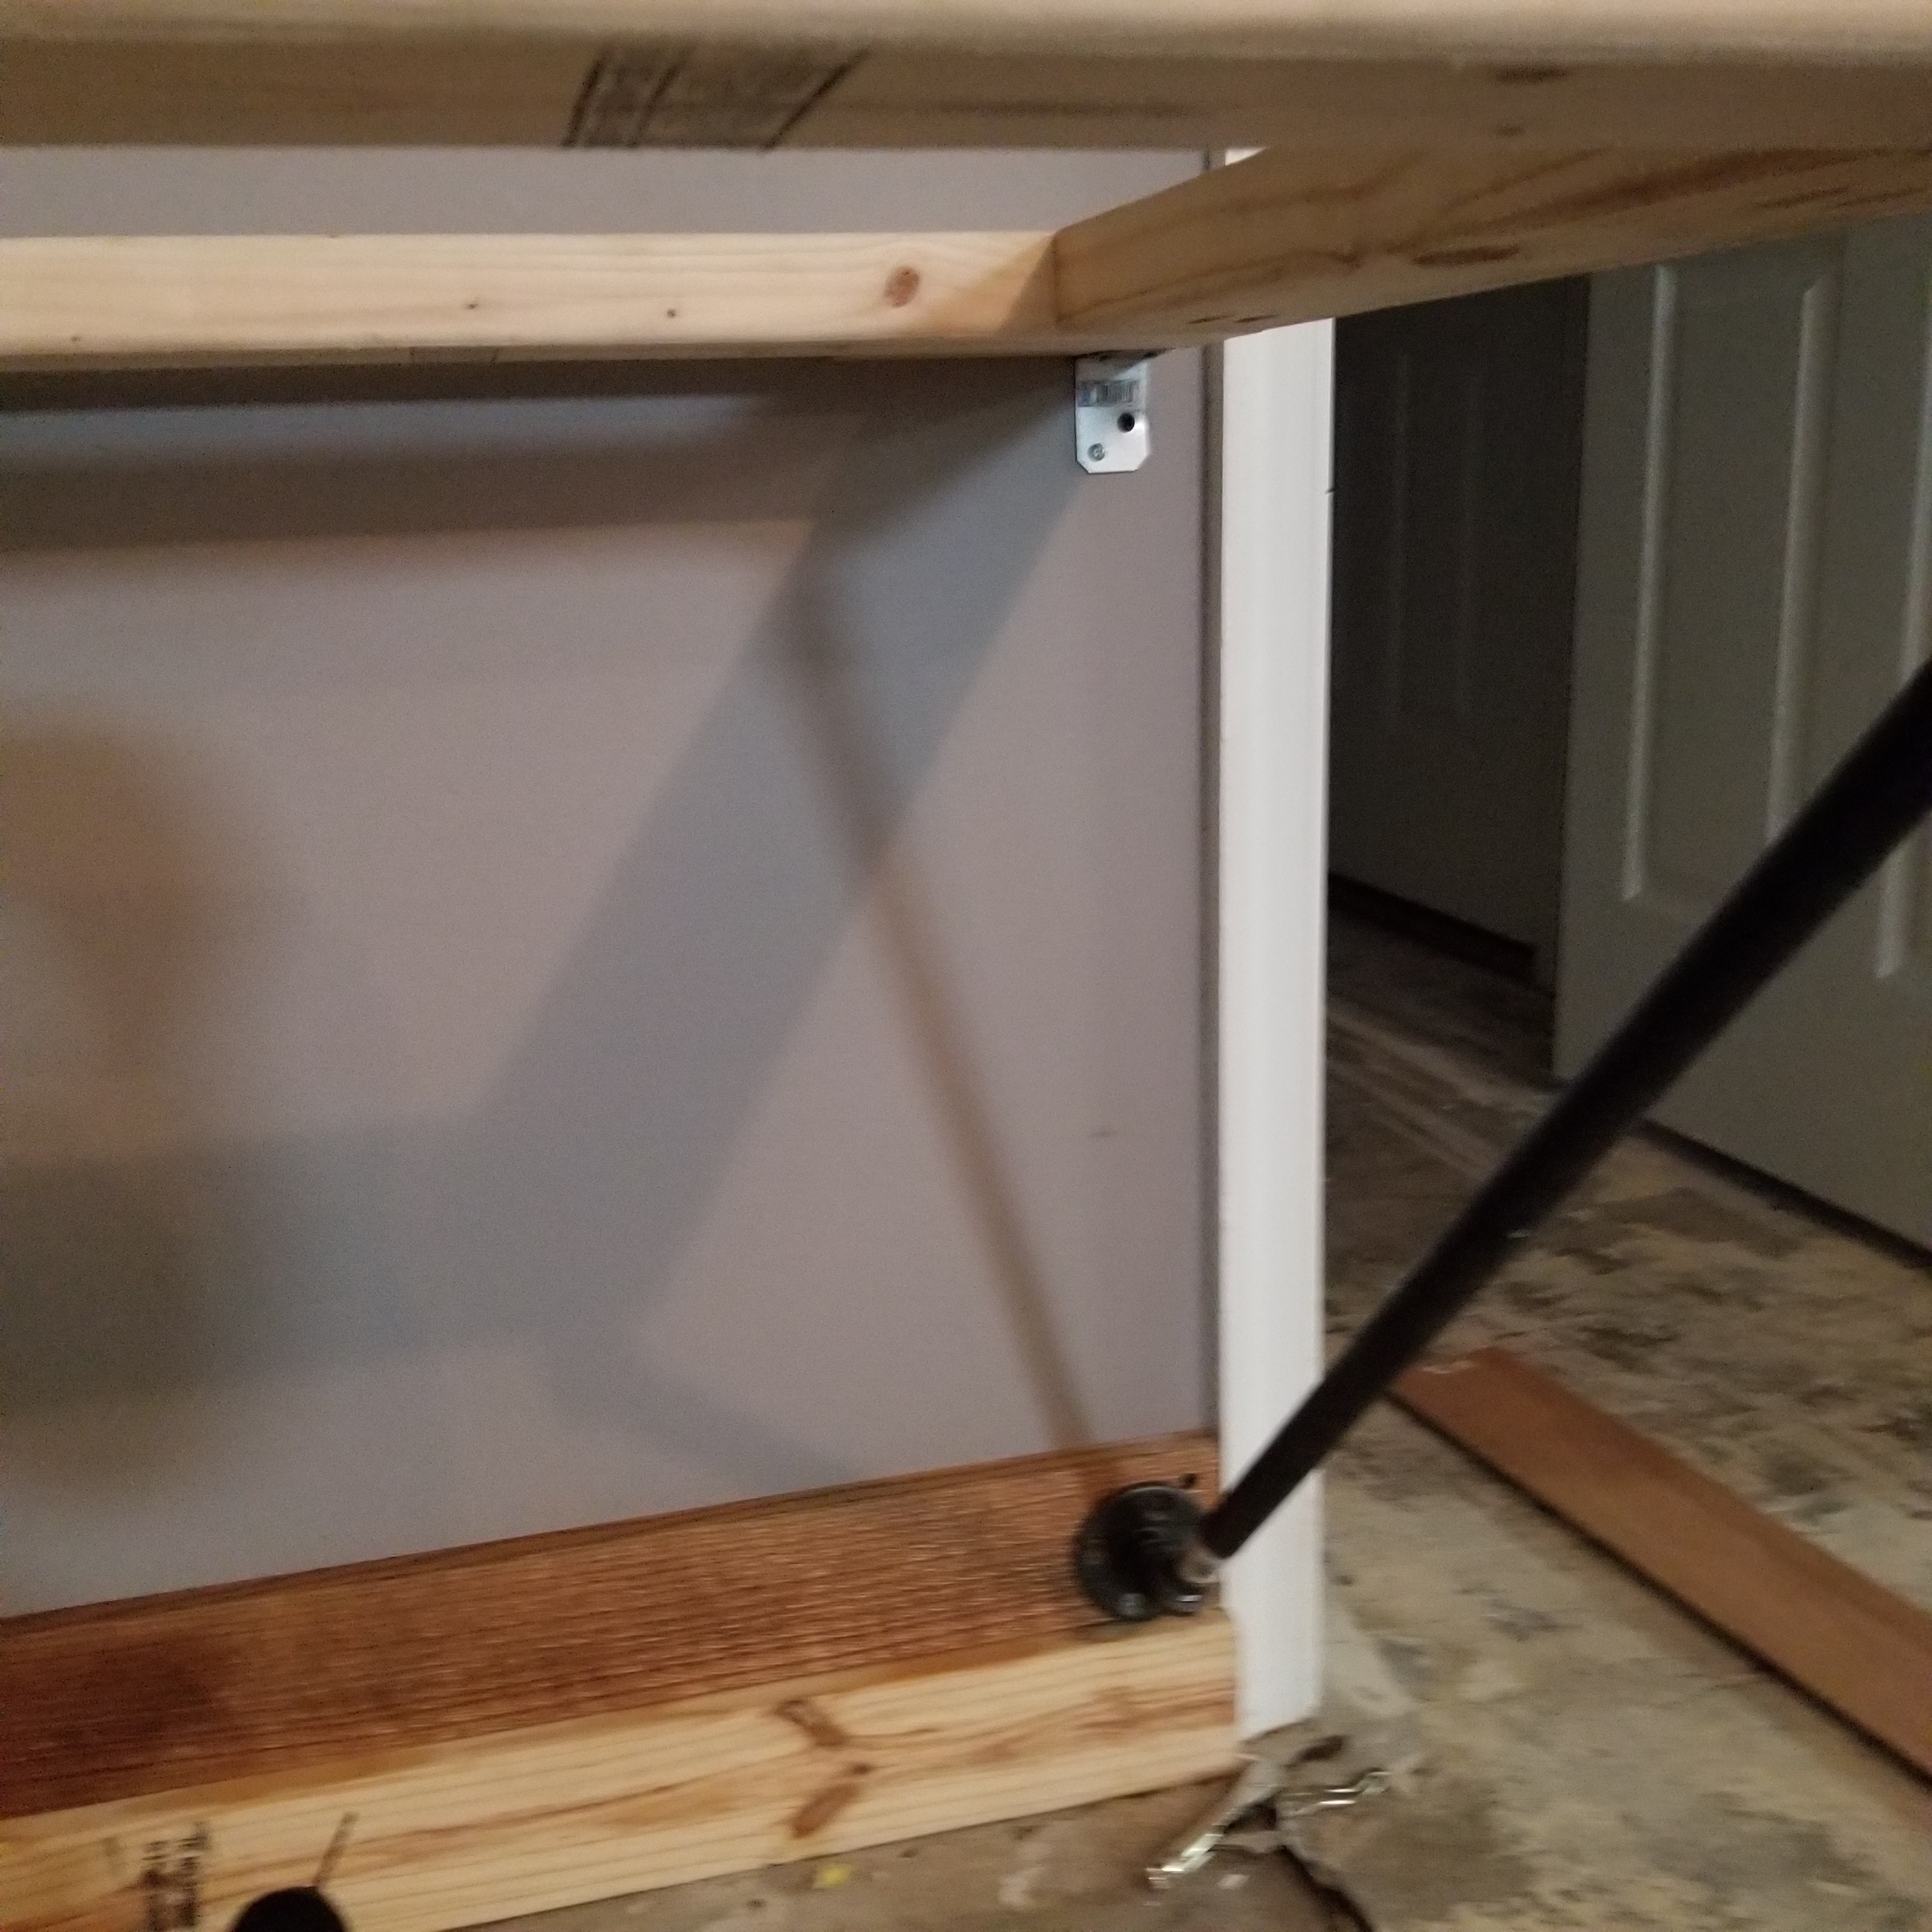
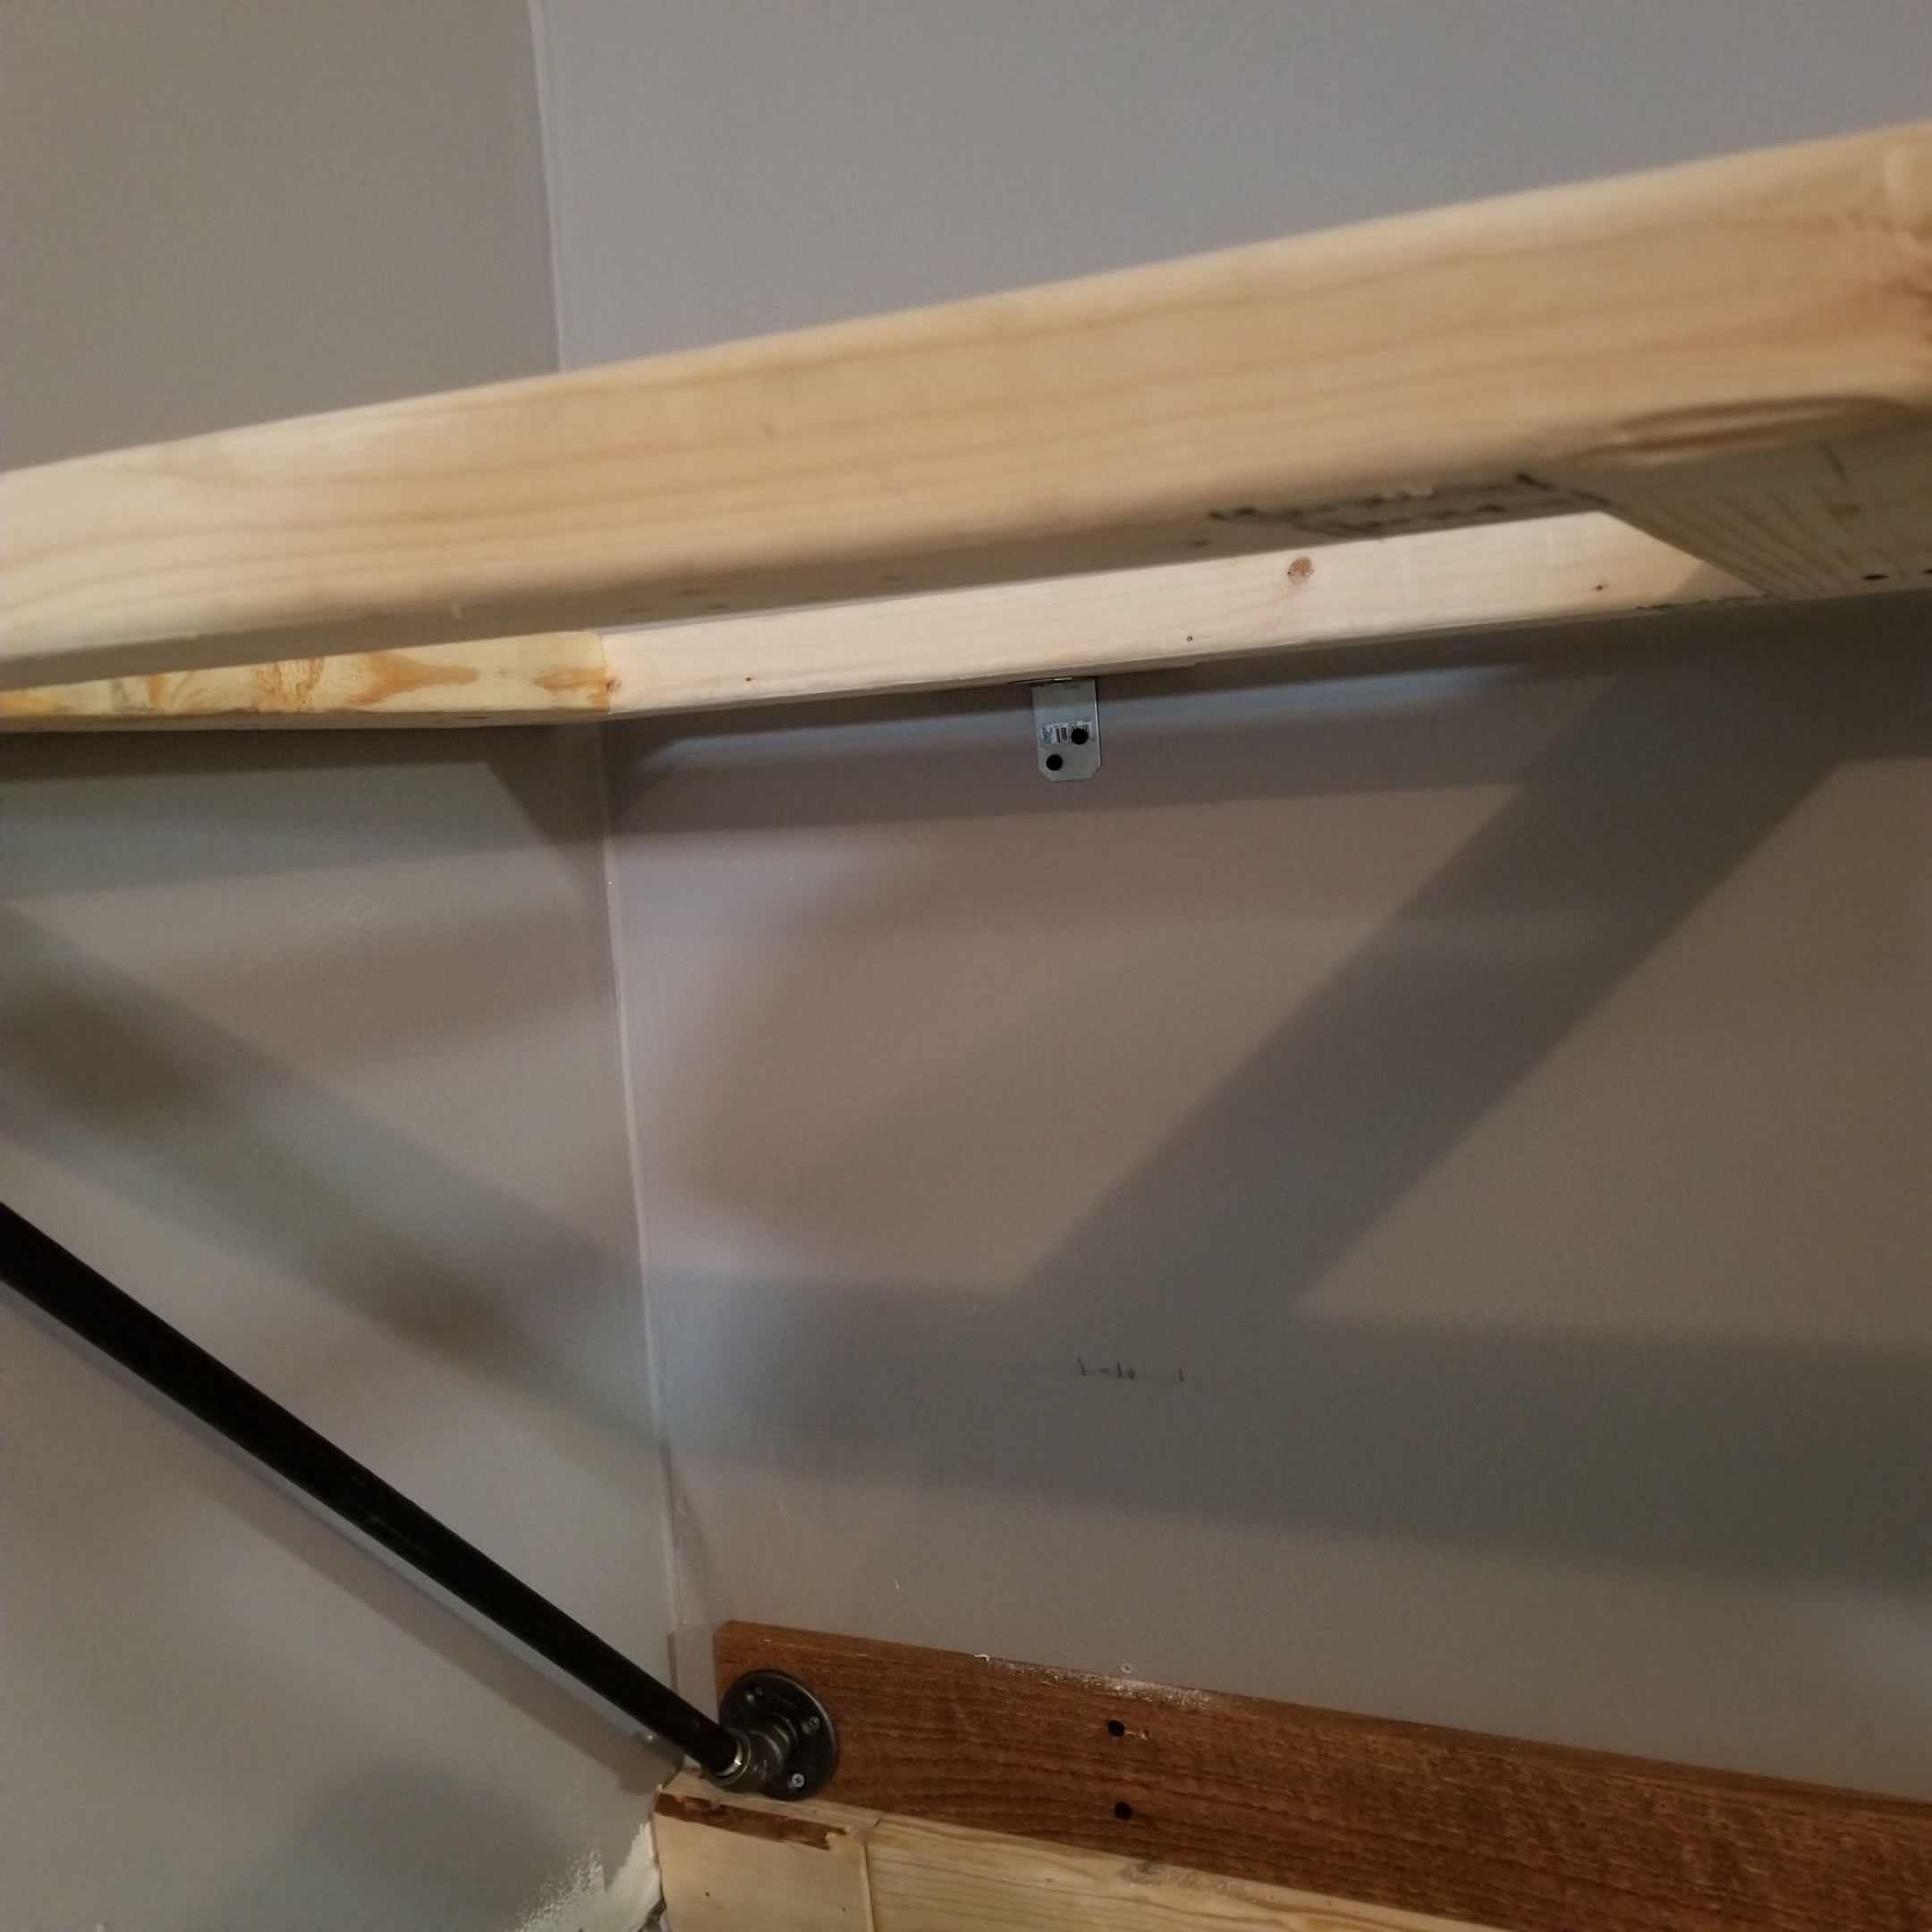
After affixing the support legs to the frame, I checked it against the wall. Problem. The combination of the oak board and the mounting flange combo made the top unlevel. To get it level I had to mount some 1.5” square boards to the back of my frames. This worked in my favor as not only did this make the desk level, it also gave me space for power cords. These new additions to my frame design also provided a perfect area to mount the frame to the wall.

Short side down Short side down


After checking for level again, I drilled my pilot holes into the oak strip for the base mounting and into the drywall and stud for the wall mounting. The frame mounted to the wall nice and level. I then dropped the pre-cut MDF top to see how it would look pre-trim. Pretty damn nice. And it’s really sturdy.


Onto the next side!

Custom Hobby Desk Project

Greetifications! Been a while since I’ve posted here (September 17). Sorry for the long delay but it has been one CRAZY year so far.

Highlights:

  • Bought a house and moved in back in December.
  • Had to breakdown my old painting setup. That desk would not have survived the trip. All my stuff is in boxes since mid-November.
  • Sump pump in new house drowns in the May monsoon in WV flooding my new sexy basement. Thank god for insurance…
  • Basement no longer sexy.

With reconstruction at about 80% done (insulation, drywall, spackle & paint down) I can now start construction of my hobby space. I tell you what, I have SEVERELY missed being able to build and paint. 11 months is WAY too long.

I’ve decided to make my first post after my hiatus to be the construction of my custom painting station. Let’s get started!

Materials
8’ Wall studs (2×4) – x4
8’ Oak board (4x.5) – x1
4’ Oak board (4x.5) – x1
4’ Oak trim (2.5x.25) – x6
MDF sheet 4’x8’ (.75” thick)
½” Pipe Flanges – x10
½” Pipe Elbow – x10
½” Pipe Nipple – x10
½” pipe cut to 40” – x5
Small “L” Deck braces – x10

Tools
Pocket Jig (Kreg)
Pocket screws
3” Wood clamp (Kreg)
Screwdriver
Miter saw
L & T squares
Pencil
Danish oil
Wood glue

Here are the pics from my build session yesterday:

Custom Workstation Frame 3


I had the MDF sheet cut down to 72”x24.5” & 52”x24.5” panels. These will be the work surfaces for the table. The wall studs are cut to 72” and 52” for the long sides and 17.5” for the short sides.

Assembly was pretty easy using the pocket jig. Seriously get one of these things. They make getting into wood shop projects easy and it’s lots of fun.

Frames are built! Next phase will be the trim.


Necron Dice Box

So anyone familiar with me is aware of my love for a good dice box. I’m always on the look out for one for my armies. I have two for my tomb kings; one I’ve shared and the other I’ve been sitting on for a few years. And I’ve one that is actually Imperial designed that I recast and painted to go with my Necron army. The second box while awesome, never settled well with me. The colors may match, but the theme is all wrong! And my neurosis would not grant me satisfaction until I found a suitable replacement. I searched and searched but never found one that was acceptable and years ago, 2012, I said to myself you’re going to have to build one. I never got around to it, and then I fell into my funk and everything went to the wayside. Till now.

Necron Dice Box - Work in Progress


Last month I started conceptualizing this dice box project. I sketched some ideas out on paper (badly) and ran it past some friends. After some re-working I started gathering parts.

First off it needed to be round. I went digging around the plumbing isle in Lowes and found a 3” repair coupling that fit the role perfectly. After a bit of sanding the piece was perfectly smooth. I did have to grind some ugly parts off and it will need some additional filling/sanding closer to the end but so far so good. I started hunting for the parts add onto the frame. Off to Plastruct!

After perusing Plastruct’s catalog for several days, I built myself a nice list of parts and made my order. Also need a lid and that took several days to find. I found this company, MSC Industrial Supply, which sold plastic disks perfect for my project. I piced up two 4” plastic disks. After they arrived, only took a day, I measured the coupling and it was just shy of 4 inches. Damn my luck. I’ll just have to fix that flaw in production.

It took another few days for the Plastruct order to arrive and by then the lid disk was nicely sanded and line divided into three parts. I also divided the coupling into three parts to make adding the plastic elements easier.

Time to begin production!

Necron Dice Box - Work in Progress   Necron Dice Box - Work in Progress   Necron Dice Box - Work in Progress

Necron Dice Box - Work in Progress


I knew a round design was going to be a pain, I had no idea. Bending that plastic was a chore that took hours. First I boiled some water and dumped the pre-cut pieces into to soften them up for bending. Little did I know that 100 degrees was not hot enough to work this plastic. I need to go HOTTER!

The oven was right out there was not way I’d be able to keep the parts from melting if it got to warm so I decided to give my wife’s hair dryer a run. The air that rushes out of the business end is really hot on the highest setting and I bet it would warm the plastic up perfectly if I was patient and careful. It took a little trial and error, but I managed to get 6 pieces bent around the coupling frame with some strong clamps. With that done, it was time to start to glue.

Necron Dice Box - Work in Progress


I got the first elements on with no problem. The hard part was getting the bent parts around the bottom of the box. I used my dremel and a round sanding bit to get the parts to fit around what I call the glowing elements. It was pretty damn difficult to get it right and I used of four of the six parts I made getting it right. I glued them down and clamped it tight for a few hours. I had to finish it one section at a time so this phase took a day or so. ~ I was so busy working on this part that I forgot to take pictures. This is a close-up the finished work. ~

Necron Dice Box - Work in Progress   Necron Dice Box - Work in Progress   Necron Dice Box - Work in Progress


The lid was easy. The pre-measured lines made adding the parts a breeze though I did have some trouble getting the vertical bits to line up correctly. I had to tear a part off and re-glue it because it was crooked. You can actually see it in the pic above.

Getting the inside of the lid has been a real trial. I could not for the life of me find a part to fit in there correctly. I settled with using some foam and some rubber bands to fill the gap. I’ll be casting this whole thing when I’m done so those parts will blend seamlessly.

Necron Dice Box - Work in Progress


I added some ½ inch plastic strips to the top of the box. These were not too hard but I did discover that my measurements for trisecting the box were off by about ¼ of an inch. Never did this before so I think that and acceptable degree of error.

Necron Dice Box - Work in Progress


Here’s the whole thing so far. Not too bad. I’m no sure on the lid as it looks like a replication of the top of the box. I don’t know what I’ll do about that at the moment. I’ll just continue with production and fix that design bug later.

Please let me know what you think so far. Feedback is very helpful!

Shawn G. (SoI)

Hobby Project – Herald on Disk of Tzeentch Part I

Now that my disk/bases are done I’ve started to put them to use. The bases will get their debut here in a few days. My first (and easiest) project will be a new Herald of Tzeentch on a disk. I’m also designing some modularization into this project to allow me to transfer the disk/rider to a large base to serve as a chariot.

Herald on Disk/Chairot

I sat down this weekend and hammered out a paint scheme for these resin disks of mine. I think it will take a few more attempts before I have something satisfactory but this design looks solid.

Resin Disk
Resin Disk

Resin Disk & Base

After painting, I mounted the disk on a Dragon Forge base I had waiting. 60mm Sanctuary in case you are wondering. Prior to painting a drilled/Dremel’d a two holes in the top and bottom to accommodate magnets for the rider and base. Unfortunately my dremel’ing was not level so the magnet set at a slight angle. It looks cool but it’s not ideal.

Herald on Disk/Chairot

Herald on Disk/Chairot

The Herald is made from the new plastic Pink Horror kit. I chose the champion and tweeked it to my liking. I added some brown apoxy putty to the bottom of his tail for the magnet. I filed it level and added the magnet. The polarity is aligned to the magnets installed in the acrylic rod of the base and the one in the disk. They should hold nicely.

The herald will be white so he stands out but I could not wash him on the disk so I set this little rig up.

Dragon Forge Base

Here’s the resin base I’ll be using for this new disk design. Again of Dragon Forge make, Temple 60x100mm this time. Damn I love his bases!!

I’ll need to place another resin base order this week come to think of it…

Stay tuned!

Custom Disk of Tzeentch Part II – Molding & First Cast

Part II of my Disk of Tzeentch project! I worked on this disk for about 2 days sanding, gap filling, and filing and sanding again. It took a while for me to get it to a acceptable standard for casting. I’ve never been more pleased with a projects outcome.

Custom Resin Disk of Tzeentch

Custom Resin Disk of Tzeentch

It did have some points of serious concern for molding. First of all, I was not completely sure it was watertight. I really didn’t want rubber flowing into the disk and screwing every thing up so I gap filled with Apoxy-Sculpt and filed it smooth where I could.

Second, it has a considerable undercut. This could pose a real problem with air bubbles and getting the resin out of the mold. The undercut does taper/slope towards the center so air bubbles were not a problem. The longer set time for the resin REALLY shined here and I was glad I made the switch. The rubber I chose is very strong so the undercut should was not an issue.

Molding was easy. I discovered there was a trapped air bubble in the rubber after demolding but I could see this would not be a problem.

Custom Resin Disk of Tzeentch

Custom Resin Disk of Tzeentch

I dared a cast last night, and it came out perfectly. I’ll need mold release as this resin sticks to my tiles with a death grip. I was lucky to get this off the tile while it was still barley soft. The first cast of my bases did not survive. They could not be removed from the tile. Had to throw it away. /sadpanda

I can’t wait to paint this up!!!!

Custom Resin Bases Part III – Molding/Demolding

Welcome to Part III of my custom resin base project. Mold Making!

Custom Resin Bases
Custom Resin Bases
Custom Resin Bases
Custom Resin Bases

Custom Resin Bases

I mixed up the rubber in a large plastic paint pot. Now this stuff usually needs a scale to measure out the 10:1 ratio but as I was using the whole trial kit that was not necessary. Each mold was poured slowly in a very thin stream into a corner (if it had one) so the rubber could work it’s own way around each base. This method prevents air bubbles.

It took 2.25 trail kits for these 7 molds (had to whip out the scale for the last bit). I made sure that each one had at least 3/4 ‘s of an inch of rubber padding. Each mold performed excellently and there were no leaks (I did spill a little on the side of a few). I allowed each base to cure for 22 hours. I usually give it a full day but I was really impatient this time.

Demolding was easy. I recovered the clay and saved it for future projects in a ziplock bag, then GENTLY pried the mold boxes of the round set off of the tile. The hot glue came away from the granite with ease. Be sure you take your time here. You don’t want to go yanking the molds up as you can tear the rubber and ruin the mold.

The acrylic boxes took a little more time. I had to cut the sides a little with an X-Acto and then peeled each side away. As expected rubber seeped under some of the bases and I had a bit of cleanup work to trim all that extra rubber away.

All and all, these came out well!

Casting to follow…

Shawn G.

Custom Resin Bases Part II – Mold Making

Welcome to Part II of my custom resin base project. I’ve been waiting for almost 2 months for this part and I couldn’t wait to get started, so here we go!

Custom Resin Bases

A few weeks back I picked up some granite tiles from Lowes for use in this project (and they worked perfectly). I plotted out real estate for each object to be casted on a tile.

Custom Resin Bases
Custom Resin Bases

After each was roughly in place, I placed their respective “mold boxes” down so I could gauge the room each would need. My mold boxes being a pair of plastic cups and old plastic bowls. The tops of each were cut off with a X-Acto knife.

Custom Resin Bases

With a hot glue gun affixed each set to the tile followed by each mold box. This part was pretty annoying as I had real difficulty getting the bases to lay flush on the tile without any gaps. I anticipated this problem and tried crazy glue but it would not cure for some damn reason (I assume it needs air to cure?). Gaps will allow for rubber to get under the object and give you cleanup work after the mold has set. I only managed to get the 40mm and 60mm sets to sit flush. All the others had small gaps. I’ll need to find a better solution…

Custom Resin Bases
Custom Resin Bases

Custom Resin Bases

I need again sing the praises of acrylic sheet. It makes for perfect mold box crafting material, as it’s cheap, easy to cut, and most importantly CLEAR. I used 3 10×8 inch sheets for the last three boxes and cut them into 2.5×10 inch strips. I glued the bases down (cursing the gaps), built/glued the boxes around them and sealed the edges with non-drying clay to prevent leaking.

I then brushed some mold release to avoid possible sticking.

Rubber pouring stage en route so stay tuned!

Shawn G.

Custom Disk of Tzeentch Part I – Master

I was asked back in November if I could recreate the Blue Scribes conversion I did for a in-store tournament in September.

Blue Scribes of Tzeentch

Blue Scribes of Tzeentch

Unfortunately the answer to that is no. The broach I used for the disk in that conversion is likely gone forever. I’ve gone back to Michael’s no less then 10 times trying to find it without success. I don’t think they sell it anymore. So screw them! I’m making my own!

The Disk of Tzeentch is a mount akin to Khorne’s Juggernaut or Slaanesh’s Boobworm, but the disk model GW has released is very uninspired IMO. This conversion will allow me to give the disk the appropriate amount of painting attention I feel it deserves.

I know this design is not very demonic but my logic is solid. By GW’s own fluff, Sorcerers have to catch and transform a screamer into a new form in order to gain this mount. I’m going with an arcane flying platform to represent my disks which I feel is fitting for a servant of Tchar.

Here is my current master:

Custom Resin Disk of Tzeentch
Top

Custom Resin Disk of Tzeentch
Bottom

I’m ordering some casting resin and silicone rubber this week for my resin bases and this project.

Stay Tuned!!

Custom Resin Bases Part I – Masters

Coming down from holiday business, a Warcraft expansion, and restarting school. Now it’s time to get this blog rollin’ again!

I wanted to take a stab at making my own resin bases. I have two paint schemes that I wanted to show off and the bases I have in mind would be perfect for displaying both. I’ve decided that my first, and likely only, base series will be a diamond plate design. I wanted a base that didn’t distract from the design so this style will be perfect.

Custom Resin Bases
Dragonforge Resin Blanks

I started with some resin blanks from Dragonforge. Jeff Wilhelm created some blanks for you to craft your own custom bases. I picked up some bike bases, 30mm rounds, and 2 large oval blanks for my set. The 25mm & 40mm will come from my base box.

Custom Resin Bases
Use a dust mask here.

I will be using plasti-card sheets with diamond plate detail for these bases (Plastruct PS-155). I needed the sheet to adhere to the bases as securely as possible so smoothed the top of each base with fine grade sandpaper.

Custom Resin Bases
Just enough sheet

I only had 1 whole sheet and 1/2 of another I needed to plot out carefully how many bases I could get from each. It turns out I had EXACTLY the amount I needed. Lucky me!

Custom Resin Bases
So far so good...

Using a T-Square I measured and cut enough for each base and glued them down with superglue. I used a paper towel to clean up excess glue under the sheets. The larger pieces were set to cure under a heavy book.

Custom Resin Bases
Perfect!

The next part was the easiest but most time consuming. I trimmed away most of the excess sheet with a fresh x-acto knife. I started with cutting the corners away then picking the bases up and trimming as close as I dared. I left a little rim of excess sheet because I don’t know about you but I find it difficult cutting a perfect circle with a razor blade. The rest of the styrene sheet was filed away with one of my flat hobby files. This allowed me to get a perfect seamless rim to all of my bases.

This part took forever, but the results were very satisfying! Take your time here and file in one direction down towards the bottom of the base. Going in the other direction will only pull off the sheet and piss you off rightly.

The next phase is the casting phase. I’ll be ordering some silicone rubber this week so I can make some molds of these bad boys. I think the time I took to get the edges smooth will pay out nicely with some seamless base edges.

Stay Tuned!!!!

Update – I took some detail pictures of my masters so you can get a closer look.

Custom Resin Bases
Master Lot
Custom Resin Bases
30mm
Custom Resin Bases
40mm
Custom Resin Bases
40mm x 75mm
Custom Resin Bases
60mm & 60mm x 100mm
Custom Resin Bases
120mm x 95mm

Mini Cleaning 101!

Now that I’ve discussed this marvelous formula, it’s time I showed you how to use it. I’ll be using an old Forgeworld bust I bought years ago and quasi-painted. I let it soak for 24 hours.

Mini Cleaning-1
Mini Cleaning-2

Mini Cleaning-

Here’s what you’ll need:

Zep Insrustrial Degreaser

  • Zep Insrustrial Degreaser
  • Plastic paint pot (paint section from Lowes)
  • Old Toothbrush
  • Rubber gloves


Mini Cleaning-4
Mini Cleaning-5

Mini Cleaning-6

Place the mini in the pot on its side and fill with Purple Goodness enough to cover.

Wait.

Mini Cleaning-7


After digging it out (use a glove), run the model under warm water for a min or so to wash off the degreaser.

Take the toothbrush and scrub off the paint rinsing it off as you go. I like to use dish soap make sure all the degreaser has been cleaned off before letting it dry and repriming.

Done.

Mini Cleaning-8
Mini Cleaning-9
Mini Cleaning-10
Mini Cleaning-11

Mini Cleaning-12

Pretty simple huh?

Shawn