I received a question a few days back on how I did the egg sac look on the back of my Tervigon. The question came at a perfect time because I had some spare green stuff from a small project I’ve been working on. So I decided to answer his question tutorial style!
Here ya go Emilio!
When I started to build my Tervigon a few months back I tried to follow the hobbyist genius that is Hydra of Warpshadow. I just could not get the glue/tissue method that he had developed to work right so I changed direction. The base form of the beast was perfect and since I had already hollowed out his (her?) back for the egg pods I needed my own process.
My design mirrors the interesting albeit gross reproduction habits of the Surinam Toad (read and educate yo self foo!). Eggs suspended in the spongy tissue in the Tyranid brood beast’s back was so perfectly alien I had to do it. And it was easy as hell to do!
Here’s what you’ll need:

- Tub-o-Egg Sacs
- Green Stuff
- Sculpting tool
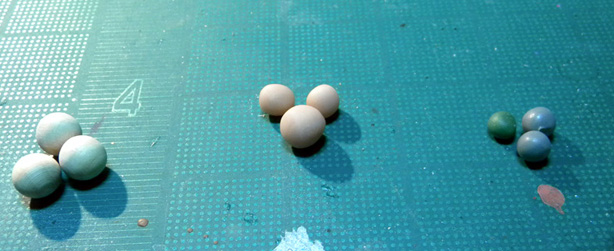
You have a choice of materials you can use for your egg sacs. Here is an example of 3 mediums I keep for potential projects:


Wooden Spheres – Bought from Michael’s. Perfect size but they are all the same dimension. Varying sizes will fit this project better.
Handmade from Sculpy – These are what I went with. You can crank out a score of these little bastards in about 10 min and they are cheap as hell too! Just roll them up, bake them for a few minutes and you’ll be ready. Vary the sizes so you have options.
Green/Grey Stuff – Have you ever had some spare green stuff leftover from a sculpting project that you had no use for? Roll it into a ball and keep it! You’d be surprised how useful that sphere will be a few weeks/months down the road.
Once you have your sacs in hand (gigity) the sculpting work is damn simple.

Roll up some greenstuff.


Push your sac into the putty (gigity) and grab your sculpting tool.


Prick the putty making a pock-like surface. You can push the putty around into new places to make the sac appear to be pushing out of the tissue.
A Slice of Advise
It would be rather expensive to fill the whole back of a Tervigon with just green stuff. I suggest you use a cheaper medium to fill most of the space and then finish with green stuff egg process. I filled most of the back of my beast with Apoxy Sculpt and added the sacs after it cured.
And that’s it! Hope you found this usefull!