Plastic Bloodcrushers

I was in my local GW shop and discovered that the Bloodcrushers that came in the black-box a few weeks back had not been painted. After chatting with the manager I was told that it was unlikely that they ever would be painted due to the staff having to crank out several units for the Isle of Blood box set.

Unacceptable!

Anyway, it took me a while to get these bastards done. The weather here in N. VA has been atrocious so getting them primed took forever. I based them with a lava theme (using cork sheets) the same as the Demon Prince.

I both hate and love these models; the Juggernauts were a joy to paint. I have not worked with metals in a very long time (years I think), and the patinaed bronze look was a real joy. The Bloodletters on the other hand I hate. For some reason I can never get these models to look the way I want. This fact has plagued me for years and that is why I never fielded them. I just can’t stand the red skin look people tend to gravitate toward but other skin tones don’t look right either.

Bah! I’ll figure it out.

Shawn

Bloodcrusher Standard
Bloodcrusher Champ
Bloodcrusher Champ
Bloodcrusher Champ 2
Bloodcrusher Musician
Bloodcrusher Champ
Bloodcrusher Champ
Bloodcrusher Champ
Bloodcrusher Champ

Modular Mega Dread

Here’s another example of how rare-earth magnets can be used to create some pretty cool custom setups. I’ve built this kit for my friend Dave G. to pay him back for the Forgeworld Hive Tyrant he gave me a few months back. This monstrosity and the Librarian Dreadnoughts are his.

This model is a HATEFULL piece when it comes down to painting. As is testament to Forgeworld kits, there’s 5x the amount of detail needed for a nice model. They go overboard sometimes and it can be a real pain in the arse to paint. With that in mind I decided to set this kit up to allow Dave some piece of mind when painting time comes around.

Modular Ork Mega Dread - 1
Modular Mega Dread - 1
Modular Ork Mega Dread - 2
Modular Mega Dread - 2

Modular Ork Mega Dread - 3
Modular Mega Dread - 3

Modular Ork Mega Dread - 4
Modular Mega Dread - 4
Modular Ork Mega Dread - 5
Modular Mega Dread - 5

Modular Ork Mega Dread - 6
Modular Mega Dread - 6

Modular Ork Mega Dread - 7
Modular Mega Dread - 7
Modular Ork Mega Dread - 8
Modular Mega Dread - 8

Modular Ork Mega Dread - 9
Modular Mega Dread - 9

Modular Dreadnought

If you’ve ever purchased a GW plastic vehicle kit you will be familiar with all the leftover bits that you can’t use. Example; a Space Marine Predator comes with all the parts to make a Rhino, but you can’t make the transport because the sponson mounts use up the two side exit ports. Build enough vehicles and you’ll amass a considerable pile of mostly useless bits. This is where a little planning and some rare-earth magnets can come through and save you some cash. Modular units FTW!

I decided to take advantage of me assembling a FW Dreadnought for a friend as a nice intro to the concept of modularization. This method can expanded on to produce some pretty cool results and allow you to take full advantage of all the elements of many plastic kits.

Here’s what you’ll need:

Materials
  • Rare-earth magnets (D203 from K&J Magnetics)
  • Superglue
  • Glue accelerant (to save on time)
  • Side cutters
  • Hobby drill
  • Dremel (1/8” dia)


Step - Ia

Step - 1b

Step I: use your hobby drill to bore a starter indentation into center of the body’s arm joint. This is to provide a guide for the Dremel to drill straight.

As a side note, all the drilling in this tutorial can all be done manually with just a hobby drill. You will have a lot more control over how deep/shallow you make your holes but it will take a lot longer to do. As this is a Forgeworld resin kit that is a viable option, but if this were a metal dread you would want to kill yourself halfway through this project.

Step - IIa

Step - IIb

Step II: Grab your Dremel and using light pressure, drill a hole into the center of the body arm joint. Make sure it’s deep enough for the magnet to fit almost flush into the hole. You’ll have to eyeball this as this drill bit is designed for the magnet to fit in the hole like a glove and you’ll have a damn hard time getting it out. If you are unsure, make the hole slightly deeper then you think you’ll need. After doing this several times you’ll be able to eyeball this process flawlessly.

As a point of safety I need to inform you about safe Dremeling. Never drill towards your hands and fingers. Holding a model in the center of your hand and using a power tool is the path to blood and tears. In that order. I’m serious people. A hobby vice is not a bad investment when using the God of Hobby tools.

Step - IIIa

Step - IIIb

Step III: Add a dab of superglue and install your magnet. I like to tip the model on its side and use the surface of my desk to press the magnet in. You’ll see that it fits snugly into the hole. Again it does not have to be flush.

Step - IVa
Step - IVb

Step - IVc

Step IV: Complete these three steps on both sides of the Dreadnought.

Step - Va

Step - Vb

Step V: Just like in the shoulder joint of the body piece, drill a starter indent into the center of the arm piece.

Step - VIa

Step - VIb

Step VI: Using the Dremel, drill your magnet hole again. You’ll need to be EXTRA careful on this step as the Dremel tool is very strong and this material is very light and you can end up drilling completely through the arm. Take your time, go slow on the slowest setting and you should be fine. Make sure it’s deep enough for the magnet to fit but flushness is not necessary.

Step - VIIa
Step - VIIb

Step - VIIc

Step VII: Sit a magnet on the outside of the one installed in the body. The strength of the magnets will cause them to align themselves correctly. Then all you have to do is add a dab of glue into the arm hole and press the arm firmly onto the body to make it fit. Pull the arm off and hit it with some accelerant to cure the glue and that’s it.

Now comes the cool part, any additional arms you may have can be added to this model. You just have to start at Step V.

The possibilities are endless.

Rare-Earth Magnets

Man there’s plethora (yes Jefe) of content to post on this subject! For those that don’t know, rare-earth magnets are a type of permanent magnet developed in the 70-80’s and is currently the strongest permanent magnet you can get your mits on. Despite what their name suggests they are not rare nor made from precious metals. The materials composing them are as common as tin or lead.

The strength in these suckers is quite surprising. In fact they can give you quite a nasty pinch only being a few centimeters across. Larger then that and you can get injured pretty severely as they will crush fingers between two or a magnet and metal sheet. Since we’ll only be dealing with the very small variety there is no risk of boo-boos.

These little gems have a variety of uses for a wargame hobbyist. My primary two uses are for movement trays for Warhammer Fantasy, and for vehicle/monster modularization. Never again shall your regiment of finely painted warriors fall all over the damn place when you try to put them on a hill/terrain. Now you can use all those sexy bits that came with your Carnifex/Razorback/Dreadnought!!!

I get all my magnets from K&J Magnetics. They have a huge product line and have excellent customer service. I’ve only ever used nickel plated as they are the cheapest and more then durable enough for everyday modeling.

Here’s what I use:

D21
D21

D-21 (1/8″ dia. x 1/16″ thick) – Perfect for small modular jobs like switching out space marine arms or something similar. Strong but they cant take too much weight axially so go easy.

D203
D203

D203 (1/8″ dia. x 3/32″ thick) – Stronger then the D21 but also thicker. These were what I used to modulate my Carnifexes back when they had options (>.<). Now I primarily use 2-3 of them for setting my cavalry for use in magnetic trays.

Use a 1/8 drill bit for your Dremel to make your depressions/holes for these two sizes. You do have a Dremel…don’t you?

D303
D303

D303 (3/16″ dia. x 3/32″ thick) – Perfect for setting up regiments for use in magnetic trays. Just superglue one of these to the bottom of your base and it’s ready to go. Try too keep all the polarities the same or you have your models snapping together and hugging when your units take casualties.

D403
D403

D403 (1/4″ dia. x 3/32″ thick) – These are the largest RE’s I use. They are much stronger then they appear and will hold a surprising amount of weight axially. Save these for your big jobs.

Use the 196 High Speed Cutter bit when installing these into resin bases or larger projects.

Seriously, go out and get some. Customization is awesome in this hobby and you can get more model for your buck with these little bastards.

Christmas comes Early!

So I’ve been eye-balling the sexy resin bases from Dragon Forge. Jeff Wilhelm produces what are (IMHO) the best resin bases on the market.  I’ve always wanted to get my hands on some but never had the proper motivation to pick any up.

Back in early July Jeff released a flagstone themed set called Temple. As soon as I saw those I knew I had to have them for my DoC army but I didn’t know when I would get them. As if he could detect my indecision, he comes out with army starter deal where you can get a whole slew of bases on the cheap.

Well I had to get in on that…

Pound O' Resin
103 in total. I'll need more I think...

Base Detail

Jeff, you are the man sir!

Daemon Prince Complete

He’s done!

Since I was on a limited schedule I could not take the time I normally would to plot out every section of the piece. I’m proud of it, but I think I went in to many directions color-wise. I like to keep my palate limited. The NMM bronze did not come out fully to my liking either but I’ve yet to master that technique.  If I could go back in time I would do the sword in a lava theme to tie the Prince to the base.

All nitpicking aside, I really had a blast painting this mini for my hobby shop. GW has outdone itself with this new kit.

Front View
Right View
Left View
Close Detail

Great Spined Shaggoth!

For my Birthday last year my wife bought me two Forgeworld (FW) models I’ve been eyeing for a long time. The Great Spined Beast and the Khornate Demon Prince.  Since I’ve had these models for so long I decided to paint one up for this Warriors of Chaos army project and use him as a Shaggoth.

Now I’m not an expert on Warhammer Fantasy history but I have no memory of the use of the term Shaggoth to represent a monster since GW attributed it to a large Dragon Ogre back in the 6th edition Beastmen army book. For my army, the term Shaggoth will characterize any large unnamed monster from the Chaos Wastes.

  • Great Spined Shaggoth – Done and done!
  • Dragon Ogre Shaggoth – Owned but needs a new paintjob
  • Great Spawn Shaggoth – (Aiming to get this for Christmas)

Not quite as Lovecraftian as some would like, but it’s a close as I can get.

I made the base from Acrylic Sheet. (More on this method to come…)

Front Right View
Front Right View
Right Side
Right Side
Front Left View
Front Left View
Front View
Front View

New Plastic Demon Prince!

So my local GW shop got a black box in Friday containing the new plastic Bloodcrushers, Pleasure Seekers, and Demon Prince!

I volunteered, begged to be truthful, for Bing to allow me to paint one of them and he handed me the Demon Prince. This model will be a modeler’s dream come true. So much detail!

I’ll he’ll be dedicated to one of the Four, but I don’t know which one…

So excited! Is my geek showing?

Demon Prince Sprue 1
Top View
Demon Prince Sprue 2
Top View (reverse)
Demon Prince Sprue 3
Close-up
Demon Prince Sprue 4
Close-up
Demon Prince Sprue 5
Flippin' the Bird...

Vallejo Paints

I’ve been a user of Citadel Paints and brushes for the entirety of my hobby life. Over the years I have found myself drifting away from GW’s line of hobby products. My standards have evolved and as such I’ve come to expect more out of the supplies I purchase. Other then GW’s new Citadel Washes/Foundations and the occasional bottle of superglue there is very little from them I use at all. Mini’s aside of course.

A few years back, a fellow hobbyist inquired if I had tried Vallejo acrylic line. Having not even heard of it he pointed me towards Granddad’s Hobby Shop (RIP) and told me to check them out. I picked up a bottle of Cobra Leather and Bonewhite and I was floored by their performance. In fact I still own and use those 2 bottles of paint I bought back in ’06!

Longevity

One of the biggest gripes I have with GW paint pots is the tendency they have of drying out. There was nothing that pissed me off more than opening a bottle of paint I used one time a few months back to find it filled with colored plastic. The new bottle caps have done wonders for slowing down this process exponentially but it still occurs. The Vallejo bottles have a nigh air-tight seal that has kept my paints in perfect condition for years.

Performance

The texture of these paints is their most impressive quality. They go on smoothly, coat well, and dry with a nice finish. The Game Color line tends to have a slightly glossy sheen to it that I’ve grown less fond of but if you use GW paints you won’t notice really. I’ve taken a fancy to their model color line as they dry with a flat matte finish.

Ease of Use

The bottles are designed for you to squeeze out as much as you need onto the palette. This has also contributed to the longevity of my paints as I only use what I need. You do need to be careful to check the top to ensure that no paint has dried in the top as you can squeeze the whole top off the bottle and paint will get everywhere. This should not happen though as the application tips are pretty secure and you would have to be squeezing pretty hard.

Color Choices

Vallejo’s Game Color mimics GW’s paint line almost color for color and shade for shade. They also still have the colors that GW has discontinued. Colors like Bilious Green, Midnight Blue, Imperial Purple, and my personal favorites Terracotta and Tanned Flesh all have equivalent colors. Why GW discontinued Terracotta and Tanned Flesh is completely beyond me. Those 2 colors are SOOO versatile and should be on every painter’s desk.

In conclusion, I give this paint line 4/5 glavens. I can’t really give the line 5 glavens as I don’t think any paint of that caliber even exists. Give this excellent line a try though you may begin to catch yourself staring at those old GW pots with contempt.

Dremel Rotary Tool

Of all the tools I have collected over the years for this hobby of mine I have to say my Dremel is the most important. I use this tool so damn much it has caused me to purchase 3.

The uses I have found for this tool are legion. Need to grind something down? There’s a bit for that. Need to saw something off? There’s a bit for that. Need to hollow something out? There’s a bit for that. Need to polish something smooth? There’s a bit for that. Want to etch something on something? There’s a bit for that. And I’m just scratching the surface of all the functions this tool can perform.

A word on safety. Be sure to wear eye protection when using this or any power tool. Dremels can rotate upwards to 35,000 rpm and though you should never have to use that type of speed for hobby work you need to be really careful. Flinging molten metal at 10,000 rpm into your eye would be well…bad.

Most of the time I use my Dremel for metal work. You should not use your sanding drum or cutting wheels on plastics. Styrene and other hobby plastics have a very low melting point and the lowest rpm setting will be enough to burn or melt them. This process will get melted plastic all over the abrasive sections of your sanding/cutting bits and can render them useless after one job. The engraving/ carving tools will not have this problem.

Recommended Bits

Sanding BitSanding Drum
Filing/Sanding/Grinding

This bit will grind through soft mini metal faster than you will believe. Take your time and keep a pot of water nearby and dip the mini into it from time to time to cool it down. You should not need to go above 10k rpm but if you do, be sure to dip the mini more often.

Diamond CutterCut-off Wheel, Diamond Wheel
Precision cutting

It’s like using a jewelers saw that functions in a fraction of the time. Again be sure to keep that water on hand to disperse some of that heat.

High Speed CutterHigh Speed Cutter
Hollowing/Carving

My favorite. I love to use this bit to replace the heads on metal minis. Use your side cutters to cut off most of it and then use this tool to hollow out a depression for your new head. Just one use of this and you’ll fall in love as I did.
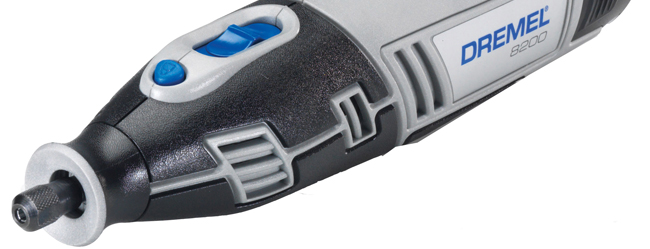
My Dremels

MiniMite

Cordless MiniMite

Pros – Small, easy to use, and perfect for small projects.

Cons – Being battery operated, I found that it tended to be low on power at inopportune moments and I would need to plug it in to recharge. It’s my fault really for not charging it after every major use but I get so absorbed in the project I just forgot.

Multi-Pro

Multi-Pro

Pros – Replaced my MiniMite as my primary tool. It’s corded so it’s always ready. No charging necessary.

Cons – This tool can get to VERY high rpm so you need to be careful. Also the cord can get in the way sometimes but you’ll get used to that quickly.

~Note~ Apparently this corded version of the Multi-Pro is currently out of production. You can likely still find it if you look hard enough. I believe it’s replacement is the Dremel 4000.

StylusStylus

Pros – Perfect tool for engraving and drilling. I use this tool for all my pining work and it’s wonderful. I’ve yet to use it for engraving but do I have future plans for that specific function.

Cons – None as of yet. This baby sits on my painting desk in its charger most of the time so I’ve yet to experience a dead battery.

Where to Buy

I got my MiniMite and Stylus from my neighborhood Lowes. The Mulit-Pro was procured from Amazon.com at a nigh criminal bargain. I recommend you get your bits from Lowes or any other hardware shop so you can see them up close.

Well I think I’ve prattled on long enough. The Dremel receives 4/5 glavens for exceptional usefulness. Get this tool, you will not be disappointed.