Custom Resin Bases Part I – Masters

Coming down from holiday business, a Warcraft expansion, and restarting school. Now it’s time to get this blog rollin’ again!

I wanted to take a stab at making my own resin bases. I have two paint schemes that I wanted to show off and the bases I have in mind would be perfect for displaying both. I’ve decided that my first, and likely only, base series will be a diamond plate design. I wanted a base that didn’t distract from the design so this style will be perfect.

Custom Resin Bases
Dragonforge Resin Blanks

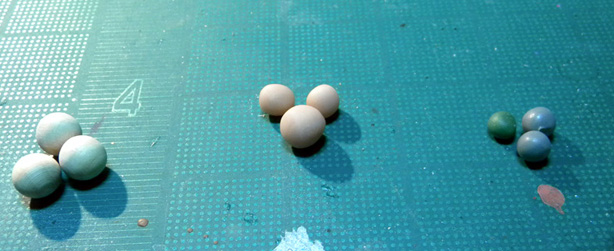
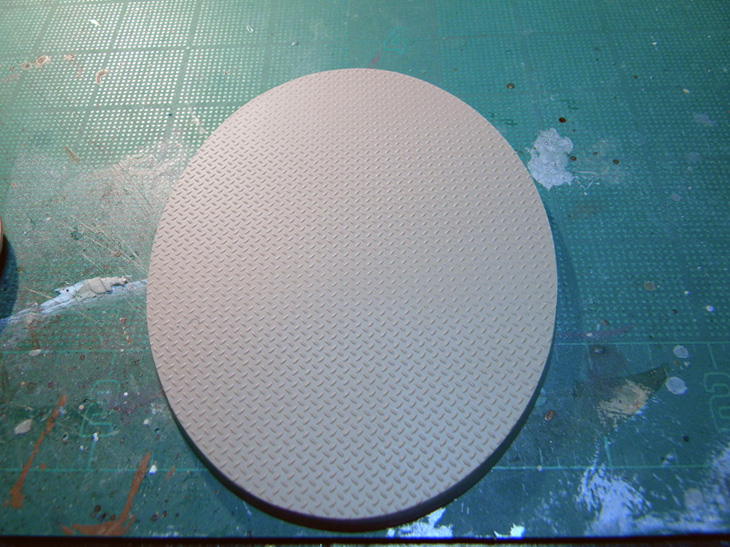
I started with some resin blanks from Dragonforge. Jeff Wilhelm created some blanks for you to craft your own custom bases. I picked up some bike bases, 30mm rounds, and 2 large oval blanks for my set. The 25mm & 40mm will come from my base box.

Custom Resin Bases
Use a dust mask here.

I will be using plasti-card sheets with diamond plate detail for these bases (Plastruct PS-155). I needed the sheet to adhere to the bases as securely as possible so smoothed the top of each base with fine grade sandpaper.

Custom Resin Bases
Just enough sheet

I only had 1 whole sheet and 1/2 of another I needed to plot out carefully how many bases I could get from each. It turns out I had EXACTLY the amount I needed. Lucky me!

Custom Resin Bases
So far so good...

Using a T-Square I measured and cut enough for each base and glued them down with superglue. I used a paper towel to clean up excess glue under the sheets. The larger pieces were set to cure under a heavy book.

Custom Resin Bases
Perfect!

The next part was the easiest but most time consuming. I trimmed away most of the excess sheet with a fresh x-acto knife. I started with cutting the corners away then picking the bases up and trimming as close as I dared. I left a little rim of excess sheet because I don’t know about you but I find it difficult cutting a perfect circle with a razor blade. The rest of the styrene sheet was filed away with one of my flat hobby files. This allowed me to get a perfect seamless rim to all of my bases.

This part took forever, but the results were very satisfying! Take your time here and file in one direction down towards the bottom of the base. Going in the other direction will only pull off the sheet and piss you off rightly.

The next phase is the casting phase. I’ll be ordering some silicone rubber this week so I can make some molds of these bad boys. I think the time I took to get the edges smooth will pay out nicely with some seamless base edges.

Stay Tuned!!!!

Update – I took some detail pictures of my masters so you can get a closer look.

Custom Resin Bases
Master Lot
Custom Resin Bases
30mm
Custom Resin Bases
40mm
Custom Resin Bases
40mm x 75mm
Custom Resin Bases
60mm & 60mm x 100mm
Custom Resin Bases
120mm x 95mm

Mini Cleaning 101!

Now that I’ve discussed this marvelous formula, it’s time I showed you how to use it. I’ll be using an old Forgeworld bust I bought years ago and quasi-painted. I let it soak for 24 hours.

Mini Cleaning-1
Mini Cleaning-2

Mini Cleaning-

Here’s what you’ll need:

Zep Insrustrial Degreaser

  • Zep Insrustrial Degreaser
  • Plastic paint pot (paint section from Lowes)
  • Old Toothbrush
  • Rubber gloves


Mini Cleaning-4
Mini Cleaning-5

Mini Cleaning-6

Place the mini in the pot on its side and fill with Purple Goodness enough to cover.

Wait.

Mini Cleaning-7


After digging it out (use a glove), run the model under warm water for a min or so to wash off the degreaser.

Take the toothbrush and scrub off the paint rinsing it off as you go. I like to use dish soap make sure all the degreaser has been cleaned off before letting it dry and repriming.

Done.

Mini Cleaning-8
Mini Cleaning-9
Mini Cleaning-10
Mini Cleaning-11

Mini Cleaning-12

Pretty simple huh?

Shawn

Zep Industrial Purple Degreaser

Cleaning minis is easy. You just need the right stuff to get the job done quickly without damaging the model. I use Zep Industrial Degreaser. It can be found in Home Depot.

I guess I can call myself lucky because this is the only cleaner I’ve ever used for model cleansing/repainting. I have heard horror tales of people loosing whole units to Simple Green shenanigans. You won’t have to worry about this stuff melting your precious hobby goodies.

Zep Insrustrial Degreaser

Pros:

Strong – This stuff is really strong. With time Zep will breakdown super glue bindings. It won’t dissolve the glue mind you, it will just make it brittle and the parts will come apart.

Fast – It takes a few hours for this stuff to work its magic but you won’t have to wait long to get your minis back. Eight hours in this dip and your minis should be good to go. I tend to leave my models soaking for around 24. Longer then this and you’ll be in the zone where it will begin to have an effect on your glue and any sculpting work you’ve done.

Gentle – I have left models, both metal and plastic, soaking in this stuff for weeks at a time with no ill effects. The paint washed off with no scrubbing needed. It’s awesome!

Cheap – A 5 gallon bottle of this stuff will cost around $6 and last you for years. I’m only on my second one.
Cons:

Use Gloves – I’m pretty sure you can use this stuff without gloves but you don’t want to. Without gloves your fingers will feel like they have some super slick oil/lube on them that doesn’t wash off with water and it’s kind of annoying. As a concentrated formula it sticks to your skin and takes several washings to get off.

Green Stuff – Zep’s only true negative. This stuff will damage your sculpt work if you leave the model soaking for too long. It softens the cured putty enough for your toothbrush to be able to scratch it. I don’t clean sculpt work often enough to provide you with a gauge. I would not soak longer then 8 hours. Be careful.

Toxic – Do I really need to go over this? It’s used to clean car parts not to drink.

Get this stuff and give it a try. You won’t be disappointed.

Shawn.

Rich Golds

I’ve been asked how I did the gold look on my Juggernauts. Before starting those models, I had not touched a metal paint pot in years. I’ve been trying to develop my NMM (non-metallic metal) technique sot I forbid myself from using metal paints to force myself to get better. I still suck at it though. >.<

Anyway, I didn’t feel like painting those bastards in NMM as that would drive me crazy so I used a style I gleaned from a tutorial on J-Runes site. I’m still developing how to do patina properly so I’ll save that method for a later tutorial.

What you’ll need:

Rich Golds-0

  • Tamiya Clear Orange
  • Citadel Gryphonne Sepia (GW)
  • Vallejo Game Color Bronze (72057)
  • Citadel Mithril Silver (GW)
  • Paint Palate (Bath Tile)


Rich Golds-1

Rich Golds-2

Step I: I started with a black prime and applied a nice coat of VGC Bronze. I watered the paint down some so I had to apply two coats for proper coverage. Make sure the coat is solid and even as the 2 washes will make imperfections very apparent.

Rich Golds-3
Rich Golds-4

Rich Golds-6

Step II: The first wash is 2/1 Tamiya Clear Orange to water. Tamiya washes are alcohol based so you’ll need to be a little careful as it will dry faster on the palate then you may expect. This wash gives the bronze a rich orange hue. The one problem I have with this wash is it’s very glossy. That’s where the Sepia comes in.

Note – Be sure to allow the Tamiya plenty of time to dry. It will need to be fully dried before you move onto the next step. Check one of the pooling areas with the tip of a brush, if it’s soft give it another 10-15min.

Rich Golds-7
Rich Golds-8

Rich Golds-9

Step III: Wash the model in Gryphonne Sepia being sure to get complete coverage. The wash will tone down the orange of the Tamiya a touch and kill the glossiness. Use the wash straight out of the pot with no dilution. Be sure to go back and soak up any heavy pooling spots with your brush before they dry.

Go make yourself a sandwich and watch some TV as this stuff takes forever to dry and I have a halogen lamp…

Rich Golds-10
Rich Golds-11

Rich Golds-12

Step IV: Highlighting is simple. Hit your highpoints with VGC bronze, 1/1 Bronze to Mithril Silver, then if you are feeling really froggy pure Mithril on the sharp edges.

Potential Issue – Highlighting brings some shininess back to the gold. From a distance (♫) this should not be a problem but if you are neurotic as I am sometimes you may want to hit the model with some matte varnish to kill the shine. I hate glossy minis.

Shawn

Bloodcrushers Mk2

I was given the Bloodcrushers & Daemon Prince I did for my local Hobby Shop back in August. But I needed to re-base them so they would fit into my army.

After some internal debate I decided to re-base them for 40k. I really prefer Flamers in WHF and really had no interest in building and painting another 3 or so crushers to fill this unit out. Besides they look really cool on the round bases. I used the 60mm rounds from Dragon Forge’s Sanctuary line.

Again, MAD respect to Jeff Wilhelm. Love his work!

Bloodcrusher Champ
Bloodcrusher Champ 2
Bloodcrusher Icon
Bloodcrusher Icon 2
Bloodcrusher Musician
Bloodcrusher Musician 2

When life gives you lemons… BLOOD FOR THE BLOOD GOD!!!

Finished at last!

This model was a marathon of painting. Every time I finished a section/part I found 10 more points of detail that needed attention. Towards the end I found myself not giving three damns about several detail locations and how they looked as I just wanted to get this bastard done and off of my plate.

I originally based this guy on a 50mm square for fantasy but he just didn’t fit in. As I’m painting this army for 40K/Fantasy I picked up some rounds from Dragon Forge and he looks at home.

Awesome model.

Khorne Demon Prince 1
Khorne Demon Prince 2
Khorne Demon Prince 3
Khorne Demon Prince 4
Khorne Demon Prince 5

Tervigon Egg Sacs

I received a question a few days back on how I did the egg sac look on the back of my Tervigon. The question came at a perfect time because I had some spare green stuff from a small project I’ve been working on. So I decided to answer his question tutorial style!

Here ya go Emilio!

When I started to build my Tervigon a few months back I tried to follow the hobbyist genius that is Hydra of Warpshadow. I just could not get the glue/tissue method that he had developed to work right so I changed direction. The base form of the beast was perfect and since I had already hollowed out his (her?) back for the egg pods I needed my own process.

My design mirrors the interesting albeit gross reproduction habits of the Surinam Toad (read and educate yo self foo!). Eggs suspended in the spongy tissue in the Tyranid brood beast’s back was so perfectly alien I had to do it. And it was easy as hell to do!

Here’s what you’ll need:

Needed Mats

  • Tub-o-Egg Sacs
  • Green Stuff
  • Sculpting tool


You have a choice of materials you can use for your egg sacs. Here is an example of 3 mediums I keep for potential projects:

Tub-o-Egg Sacs
Tub-o-Egg Sacs

Choice of Eggs
Wooden - Sculpy - Putty


Wooden Spheres – Bought from Michael’s. Perfect size but they are all the same dimension. Varying sizes will fit this project better.

Handmade from Sculpy – These are what I went with. You can crank out a score of these little bastards in about 10 min and they are cheap as hell too! Just roll them up, bake them for a few minutes and you’ll be ready. Vary the sizes so you have options.

Green/Grey Stuff – Have you ever had some spare green stuff leftover from a sculpting project that you had no use for? Roll it into a ball and keep it! You’d be surprised how useful that sphere will be a few weeks/months down the road.

Once you have your sacs in hand (gigity) the sculpting work is damn simple.

Green Stuff
Green Stuff

Roll up some greenstuff.

Part - I
Push egg...
Part - II
...into putty

Sculpting Tool
Don't hurt yourself...

Push your sac into the putty (gigity) and grab your sculpting tool.

Pock Marks
Pock Marks
More Pocks
Moar Pocks

That's it!
That's it!

Prick the putty making a pock-like surface. You can push the putty around into new places to make the sac appear to be pushing out of the tissue.

A Slice of Advise

It would be rather expensive to fill the whole back of a Tervigon with just green stuff. I suggest you use a cheaper medium to fill most of the space and then finish with green stuff egg process. I filled most of the back of my beast with Apoxy Sculpt and added the sacs after it cured.

And that’s it! Hope you found this usefull!

Demons of Chaos WiP

My content posting has slowed down somewhat over the last few weeks but it has not been due to laziness. Well not entirely at least…

Here are 2 of the big baddies I’ve been working on for my demonic horde. I’ll have better pictures when they are done. My wife annexed the lamp I was going to use for extra lighting. I’ll need to get another one.

I’m also finishing up my old school horror unit (30 deep) and I have a unit of bloodletters that I must complete that I’m dreading (also 30 deep). I hate painting them! They never come out the way I want!

Kiros Fateweaver Work in Progress 1
Fateweaver Wip-1

Kiros Fateweaver Work in Progress 1
Fateweaver Wip-2

Khornate Demon Prince Work in Progress
Demon Prince WiP-2
Khornate Demon Prince Work in Progress
Demon Prince WiP-1

Blue Scribes of Tzeentch

I’ve been a busy bastard lately. I looked at all the armies I own and realized that I have not had a completely painted army since ’04. Heresy! With this fact in mind I decided to focus on getting the one army that I have had sitting around 80% for years now complete; my Tzeentch Demonic Horde. I’ll post more on that later.

This conversion(?) came together while in Michaels. I had been looking for a suitable disk for the scribes for some time and found the perfect example in a cheap metal pendant in their beads aisle. The tome comes from the Covenant of Menoth, with some extra terrain bits I had kicking about.

I was going to add a slew of scrolls and crap around the disk as arcane clutter but changed my mind in the end. I felt it would be too distracting. I’m not finished with this piece. I still have to add the text into the tome as my Prima art pens have yet to arrive. I’ll then flat coat (Krylon Crystal Clear Flat) the model and pick out the gems in gloss varnish. The base comes from Dragon Forge’s Temple line. Thanks again Jeff. Love your work.

I tried to complete this for a Tournament at last Friday’s Vets night and I almost pulled it off. The model was well received but I placed poorly. Really poorly…

Blue Scribes of Tzeentch
Front Right
Blue Scribes of Tzeentch
Left Side
Blue Scribes of Tzeentch
Rear
Blue Scribes of Tzeentch
Top Front
Blue Scribes of Tzeentch
Top Left
Blue Scribes of Tzeentch
Top Rear